
- Improve Sharpness, Brightness, and Contrast
Improve the brightness, contrast, or sharpness of the picture. - Adjust Picture Colors
Change the color of the picture to improve quality or match document content. - Set Transparent Color in a Picture
Make a color in the current picture transparent. - Adjust Picture Transparency
Adjust the picture’s transparency to allow what is behind it to be seen. - Add Artistic Effects
Make the picture look more like a sketch or painting. - Compress Pictures
Reduce document size by compressing its pictures. - Change Picture
Replace the current picture, while maintaining the size and position of the picture object. - Reset Picture
Discard all of the formatting changes you made to the picture.
Correct picture’s sharpness, brightness, and contrast
If your inserted picture in the document is too bright or contrasty, dim or faded, or a bit out of focus, use the Corrections command to fix these problems by adjusting the sharpness, softness, brightness, and contrast options of a picture:
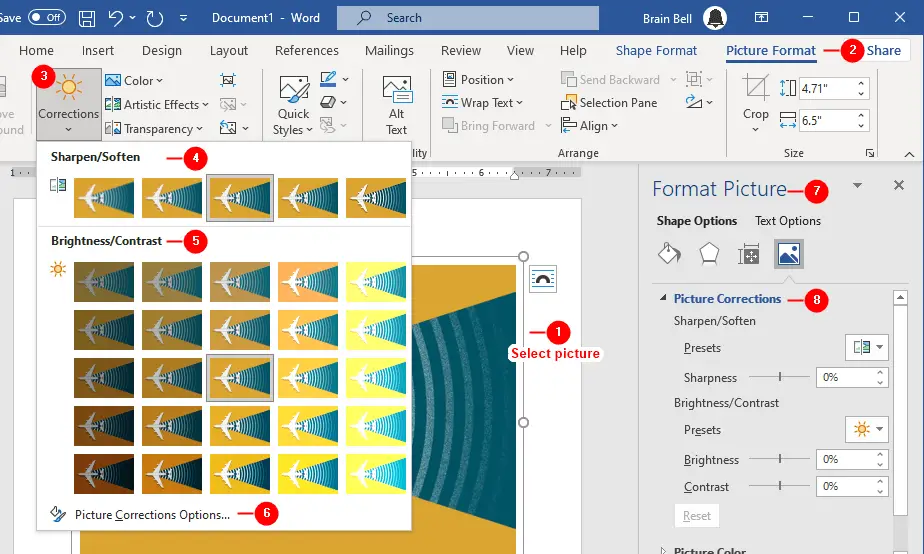
- Click on the picture to select it.
- Click on the
Picture Formattab which becomes available anytime you click on a picture. - Click the
Correctionsdrop-down button in theAdjustgroup.
The menu shows a grid of image thumbnails and displays the preview by the various sharpness, softness, brightness, and contrast settings. - Click on a thumbnail under the Sharpen/Soften section to adjust the focus.
- Or, choose a thumbnail from the Brightness/Contrast section if you want to adjust the brightness or contrast of the image.
- Click the
Picture Corrections Optionscommand, if the pre-defined adjustments are not suitable. - The
Format Picturepane appears on the right side of the document. - Use the
Picture Correctionscontrols to manually adjust the sharpen, brightness, and contrast adjustments.
Adjust Picture Colors
In this tutorial, you’ll learn how to adjust a picture’s colors to make its look best. For example, you can change its color saturation and color tone settings, or give it a uniform look by recoloring it.
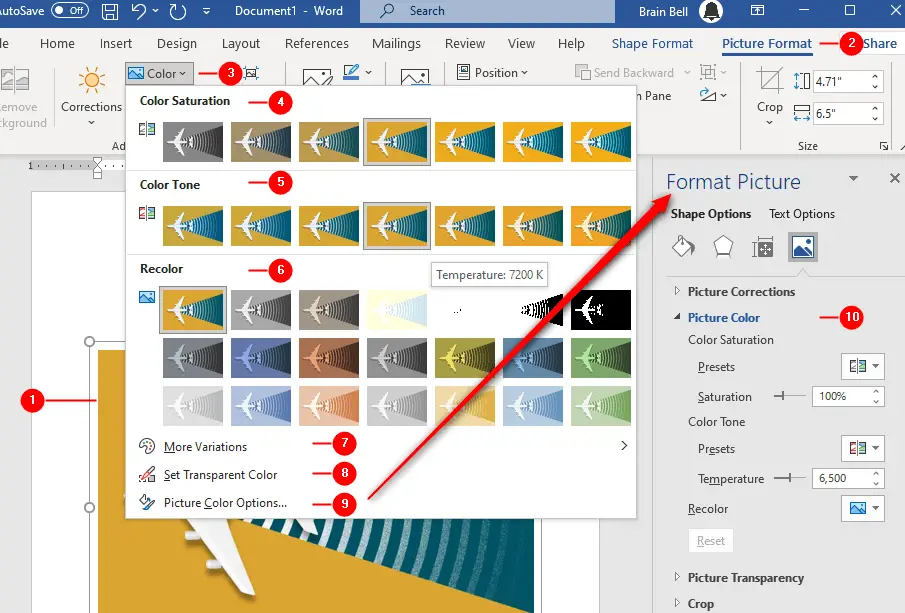
- Click on the picture to select it.
- Click on the
Picture Formattab which becomes available anytime you click on a picture. - Click the
Colordrop-down button in theAdjustgroup.
The menu shows a grid of image thumbnails and displays the preview by the various color saturations, color tones, and recolor adjustments. When you point the mouse at one of the thumbnails, you see a live preview of the effect on the image in your document. Choose a thumbnail to apply that effect to the image.
- Color Saturation adjusts the intensity of the colors, use this command to control the overall amount of color in the picture.
- Color Tone controls the overall temperature/warmth of the picture’s actual color by adjusting lightness and darkness.
- Recolor changes the primary color visible in the picture.
- More Variations shows more recoloring choices.
- Set Transparent Color makes any color transparent in the picture.
- Picture Color Options opens the
Format Picturetask pane. - Use the Picture Color section to manually adjust the Color Saturation, Color Tone, and Recolor settings.
Set Transparent Color
You can use the Set Transparent Color command to make any color transparent in a picture. This command works by making all the pixels in a picture that are the same color transparent. Any text or object that is behind the picture will show through the transparent areas:
Set Transparent Color to make any color transparent in a picture- Click on the picture to select it.
- Click on the
Picture Formattab which becomes available anytime you click on a picture. - Click the
Colordrop-down button in theAdjustgroup. - Choose the
Set Transparent Colorcommand and click in your picture on the color that you want to be transparent. - Repeat the above steps to make another color in your picture transparent.
Adjust Picture Transparency
Transparency determines how much of the text (or whatever is behind the picture) shows through it. By default, images are not transparent at all when you insert them into a Word document. To set the transparency, follow these steps:
- Insert a picture in your document or click on an existing image to select it.
- Click
Layout Optionsicon on the top-right of the picture and chooseIn Front of Textoption to bring the image in front of the text (or whatever object). - Click on the
Picture Formattab which becomes available anytime you click on a picture. - Click
Transparencydrop-down button and choose a pre-defiend transparency level (thumbnail) from the gallery. - Or, click
Picture Transparency Optionsto open theFormat Picturetask pane, where you can choose a preset or set the transparency percentage manually in the “Picture Transparency” area.
Apply Artistic Effects
Microsoft Word provides several different artistic effects, such as blur, glass, cement, texturizer, cutout, photocopy, line drawing, paintbrush, etc. that alter the appearance of a picture. Follow these steps to apply artistic effects to a picture:
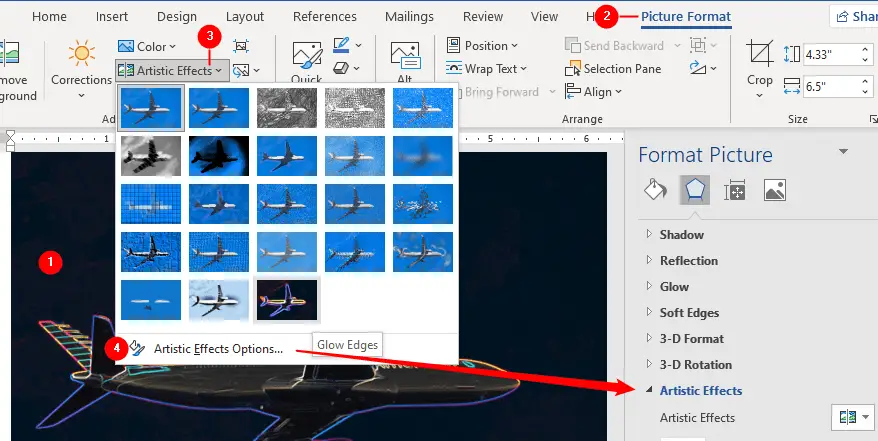
- Click on the picture to select it.
- Click on the
Picture Formattab which becomes available anytime you click on a picture. - Click the
Artistic Effectsdrop-down button in theAdjustgroup, hover the mouse pointer over each effect to see its preview on the selected picture. Hovering the mouse over an effect also displays the effect’s name.
Compress Pictures
Inserting pictures into your document can increase its file size. You can reduce the document size by compressing its images. MS Word includes a feature “Compress Pictures” that lets you compress just a single or all images in your document at once:
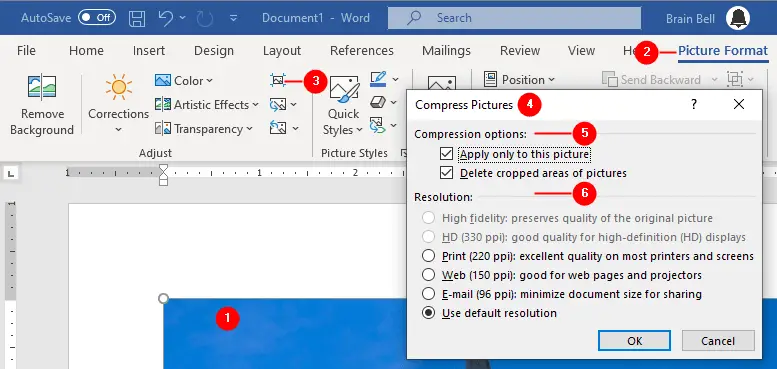
- Click any image to select it.
- Click on the
Picture Formattab which becomes available anytime you click on a picture. - Click
Compress Picturesicon in the Adjust group. - The
Compress Picturesdialog box appears. - Compression options
The Compress Pictures dialog box has two compression options:- Apply only to this picture
By default, this option is checked, leave it checked if you want to compress only the selected picture. Uncheck this option to compress all the pictures in the document - Delete cropped areas of pictures
By default, the Compress Pictures command removes any parts of your pictures that have been cropped. Uncheck this option if you don’t want to remove cropped areas.
- Apply only to this picture
- Resolution
Choose a resolution (ppi: pixels per inch) so that image quality will still be good when the pictures are displayed or printed. Choosing a higher ppi setting requires more disk space. For example, choosingPrint (220 ppi)option takes up more disk space than theE-mail (96 ppi)option. - Click OK to compress the images and then save the document. It may take a few moments if your document has a lot of images.
Change Picture
To replace a selected picture on a document:

- Click the image to select it.
- Click on the
Picture Formattab which becomes available anytime you click on a picture. - Click
Change Pictureicon in the Adjust group. - Choose
From a Fileto select a picture that is already on your computer.
(or any other option which suits your requirements:From Stock Images,From Online Sources,From Icons, orFrom Clipboard.) - Select a different picture in the dialog box.
Reset Picture
If you don’t like the picture style, color, or effect you applied, Word allows you to reverse all your format and size changes by resetting the photo:

- Click on the picture to select it and then click on the
Picture Formattab which becomes available anytime you click on a picture. - Click the
Reset Picturedrop-down button in the Adjust group. A menu appears through which you can choose how should the image be reset: - Choose
Reset Pictureto discard formatting changes (corrections, color, styles, effects, etc.) only. - Choose
Reset Picture & Sizeto discard all formatting and size changes.
