In this tutorial we’ll create a child-theme based on the Twenty Twenty theme and remove “Powered by WordPress” text in the child theme by editing footer.php file. To create Twenty Twenty Child theme, follow these steps:
- Create a folder (directory)
twentytwenty-childin your computer and create following files in it: style.cssfunctions.phpfooter.php(and/or any other theme file which you want to customize, for example: header.php)
style.css
Open any code or text editor (such as Notepad for the PC or TextEdit for the Mac) and save the file as style.css in twentytwenty-child folder. You must add the following CSS comments to indicate the theme name, child-theme version (for example 1.0.0 or 1.2.1), and its parent template name (usually the directory name of parent theme):
/* Theme Name: Twenty Twenty ChildVersion: 1.0.0Template: twentytwenty */
After adding the required comments, you can add your own styles to customize the theme (or override the existing styles inherited from the parent theme). For example, to change the color of main heading, use following code in style.css file after adding the required comment code:
/* Theme Name: Twenty Twenty ChildVersion: 1.0.0Template: twentytwenty */ h1 {color:red}
Child theme css not working
You must include the version number inside the comment section css file to make child-theme work properly. For example, the following css file will not work as it is missing the version number:
/*
Theme Name: Twenty Twenty Child
Template: twentytwenty
*/
h1 {color:red}
functions.php
Open any code or text editor (such as Notepad for the PC or TextEdit for the Mac) and save the file as functions.php in twentytwenty-child folder. When you create a child theme, by default it does not loads the parent style sheet (style.css). To load the parent style sheet in a Twenty Twenty child theme, use following code:
<?php

add_filter('wp_enqueue_scripts', 'enqueue_style_css' );

function enqueue_style_css() {
 $parenthandle = 'twentytwenty-style';
 $theme = wp_get_theme();

 wp_enqueue_style(
  $parenthandle,
  get_template_directory_uri() . '/style.css',
  array(),
  $theme->parent()->get('Version')
 );

 wp_enqueue_style(
  'child-style',
  get_stylesheet_uri(),
  array( $parenthandle ),
  $theme->get('Version')
 );

}
Remove “Powered by WordPress” – footer.php
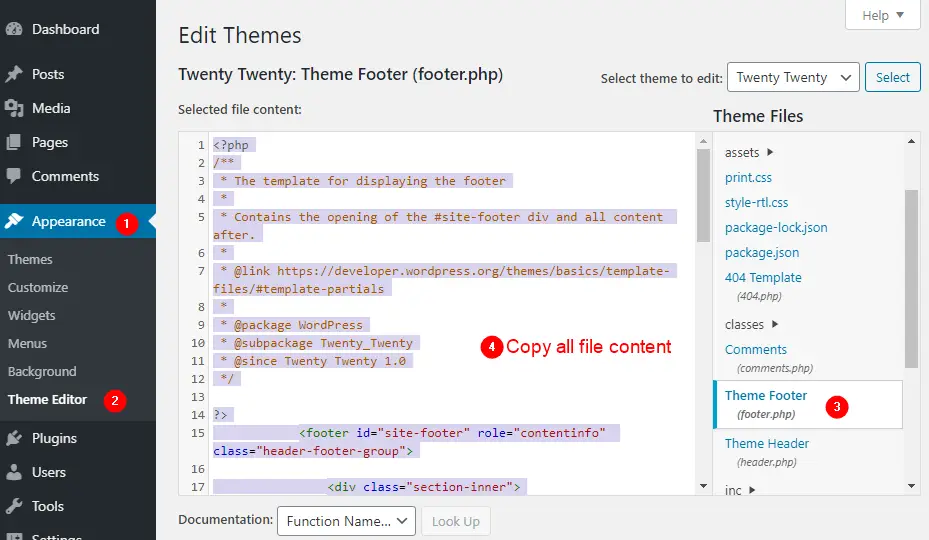
1. From the WordPress Dashboard, click Appearance > Theme Editor > Theme Footer (footer.php) and copy all the content.
2. Open any code or text editor (such as Notepad for the PC or TextEdit for the Mac), paste the copied text and save the file as footer.php in twentytweny-child folder.
3. To remove Powered By WordPress, delete the following lines from the new footer.php created in child theme folder:
<p class="powered-by-wordpress">
 <a href="<?php echo esc_url( __( 'https://wordpress.org/', 'twentytwenty' ) ); ?>">
  <?php _e( 'Powered by WordPress', 'twentytwenty' ); ?>
 </a>
</p><!-- .powered-by-wordpress -->
Save the file.
Installing Twenty Twenty Child Theme
- From your computer, compress the
twentytwenty-childfolder - From WordPress Dashboard, select
Appearance > Themesand clickAdd New. - Next, click
Upload Theme > Choose File, select thetwentytwenty-child.zipfile, and clickInstall Nowbutton. - After successful installation, activate the theme.
