
The Font group in the Home tab enables you to format your document’s text with a mouse click. This group has about sixteen formatting commands (as mentioned in the figure). To know the purpose of a command, hover the mouse pointer over it. For example, when you hover the mouse pointer over the Bold command button, a small description and the keyboard shortcuts are shown in the ScreenTip. See figure:

Save Time with Live Preview
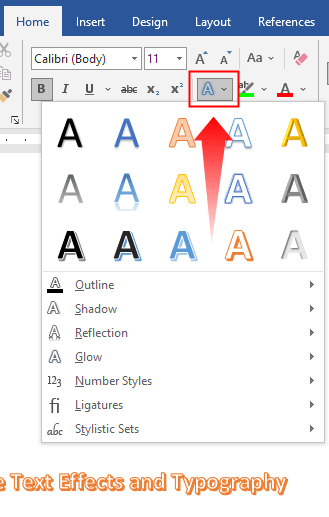
Some Font group commands show the live preview to help you to choose the best option. In the following figure, the Live Preview shows how the Text Effect would look when applied:
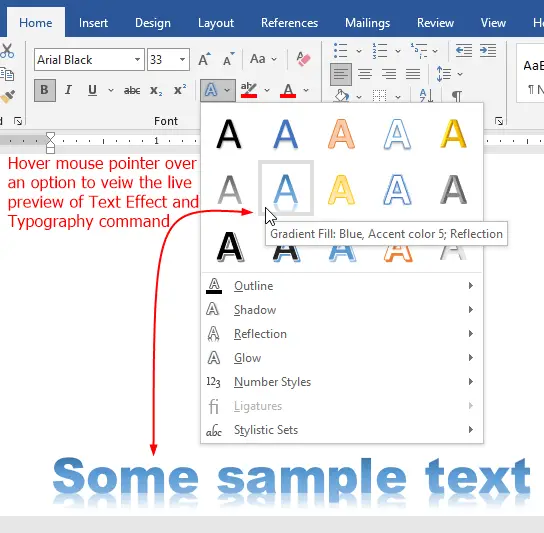
As shown in the above figure, Live Preview shows the preview of the hovered (but not yet applied) option.
The following commands support the live preview in the Font group:
- Font
- Font Size
- Text Effects and Typography
- Text Highlight Color
- Font color
Font
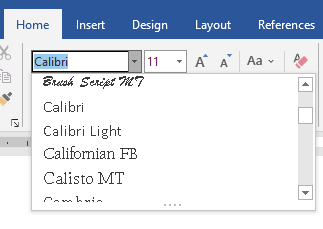
A font defines the appearance of your text. Your operating system includes many built-in fonts you can apply to your documents. To change the font of your text, first, select the text and then click the Font drop-down menu and select the desired font.
Embedding Fonts
When you use a unique font in a document, the text formatted with that font may not display or print correctly on other users’ computers. To solve this problem, you can embed the fonts used in a document when saving. See, how to embed fonts in a document?
Font Size

- Keyboard shortcut to increase the font size:
Ctrl+Shift+> - Keyboard shortcut to decrease the font size:
Ctrl+Shift+<
Use the Font Size drop-down menu to choose a size for the selected text. To apply a size not included in the drop-down list, type a new size, and press Enter. You can also either decrease or increase your font size by clicking on the alphabet A that is situated just beside the Font Size menu. To increase the font size click the bigger A (or press Ctrl+Shift+>) and to decrease the font size click the smaller A (or press Ctrl+Shift+<).
Change Case
Keyboard shortcut: Shift + F3
The Change Case menu is represented with the capital letter ‘A’ and a small letter ‘a’ Aa in Font group. It enables you to transform text from small letters to capital letters or a mixture of both with other preferred options.
To change the case type:
- Select text that you want to change to another case type
- Click
Hometab - Click
Change Casebutton from theFontgroup - Select your desired case type from the menu (or press the
Shiftkey on your keyboard and hold it down while you press theF3function key).

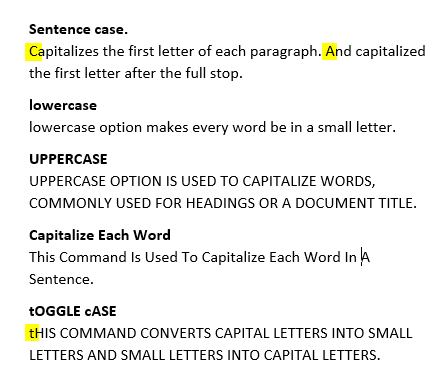
The Change Case command offers the following cases:
- Sentence case.
Capitalizes the first letter of each paragraph and capitalized the first letter after the full stop. - Lowercase
lowercase option makes every word be in a small letter. - Uppercase
UPPERCASE option is used to capitalize words, commonly used for headings or a document title. - Capitalize Each Word
This command is used to capitalize each word in a sentence. - Toggle Case
This command converts capital letters into small letters and small letters into capital letters. Useful when you accidently pressed the caps lock button while writing a document.
Clear All Formatting
- Keyboard shortcut to remove
Fontgroup formatting:
Select text and pressCtrl+Space. - Keyboard shortcut to remove
Paragraphgroup formatting:
Select paragraphs and pressCtrl+Q
Click Clear Formatting command in the Font group to remove all formats (which you applied through the Font group, such as font size, bold, italic or underline) from the selected text. Follow these steps to remove all text formatting:
- Select text
- Click
Hometab - Click the
Clear Formattingbutton from theFontgroup
Troubleshooting
I’ve selected the text and clicked the Clear Formatting command but some formats have not been removed.
The Clear Formatting command clears all character formats (available through Font group) except the following commands:
Change Case
Clear Formatting command doesn’t change the text case.Text Highlight Color
Clear Formatting command doesn’t remove text highlighting.
Bold, Italic, Underline
Keyboard shortcuts:
- Bold:
Ctrl+B - Underline:
Ctrl+U - Double underline:
Ctrl+Shift+D - Italic:
Ctrl+I
To apply either bold, italics, or underline format, or a combination of any of them, first select the text, then navigate to the Font group under Home tab and select your desired command:
- Click
Bicon (or pressCtrl+B) to apply the bold format. - Click
Iicon (or pressCtrl+I) to apply the italic format. - Click
Uicon (or pressCtrl+U) to apply the underline format.

For the underline option, you can choose to use single or double underline format. To choose either of these, click the drop-down icon by the underline icon to show the drop-down menu for the selection of various choices.
Strikethrough
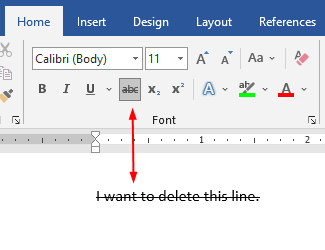
The Strikethrough command draws a line through the text. It is often used to identify text for reviewer proposes to delete. To use this command, first, select the text, then navigate to the Font group under Home tab and click the abc
Subscript and Superscript
Keyboard Shortcuts:
- For Subscript command use
Ctrl+= - For Superscript command use
Ctrl+Shift+=
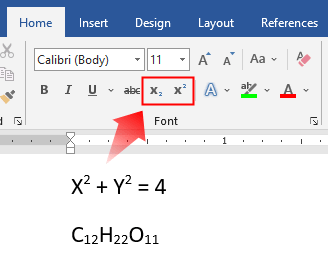
The superscript notation makes text above the text line, while the subscript notation makes text below the text line. These commands are commonly used in the mathematical expression and chemical formulas.
- Select the text.
- Click the
Hometab. - Click the
X2icon (or pressCtrl+Shift+=) to Superscript the text, - Or click the
X2icon (or pressCtrl+=) to Subscript the text.
Text Effects and Typography
You can use the Text Effects and Typography menu to beautify the text by choosing one of the following options: Outline, Shadow, Reflection, Glow, Number Styles, Ligatures, or Stylistic Sets.
.
- Select the text to apply an effect.
- Click the
Hometab. - Click the
Text Effects and Typographybutton in theFontgroup. - Point the mouse at any preformatted effect to see its live preview and apply it.
- Or click the name of effect in menu, such as,
Reflection. - Then make selections on the submenus to apply and modify those effects.
Text Highlight Color and Font Color
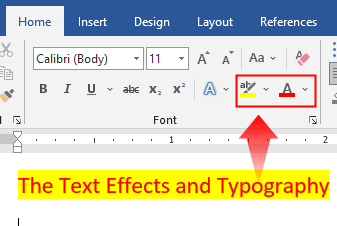
Font Color
You can select to use a different color for the selected text. To change your text color, click the Font Color icon in Font group under the Home tab. This will show a menu of color options, which you can choose from as per your choice.
To highlight text
Select the text and then click the Text Highlight Color icon in the Font group on the Home tab to apply the default highlight color or click the arrow (on the right side of the icon) for more colors, and then click a color swatch to apply the selected highlight color.
Font Dialog Box
Keyboard Shortcut: Ctrl+D
The Font dialog box lists all font (or character) related formatting. To open the Font dialog box, click the Dialog Box Launcher button in the lower-right corner of the Font group (or press the Ctrl+D).

The Set As Default button is used to change the font formatting that Word uses for a new document. For example, if you want to use a specific font, font size, font color or any other attribute for all your new documents, choose all that formatting and then click the Set As Default button. A new dialog box will appear
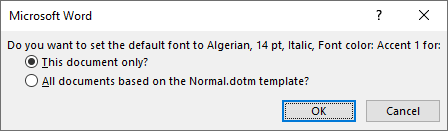
In the confirmation dialog box, choose the option “All Documents Based on the Normal Template”. Now all documents start with the font formatting you selected.
Font dialog box – Advanced tab
Character Spacing
To set the character spacing (including character scale, spacing between characters, character vertical position ), use the Advanced tab in the Font dialog box:
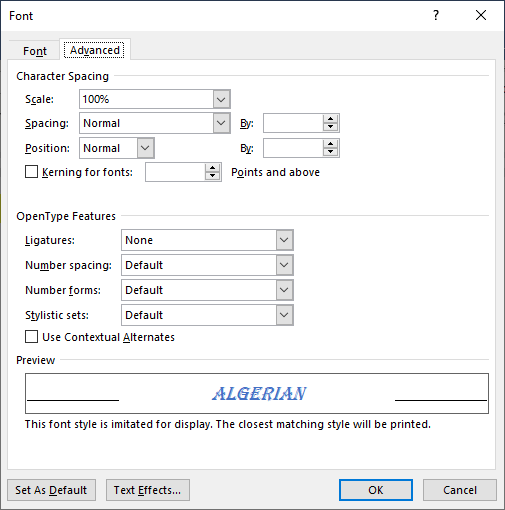
The Character Spacing section has the following options:
- Scale
Character scale stretches or shrinks the width of characters and this option does not change the height of the character. - Spacing
Character spacing or letterspacing changes just the horizontal space between characters. The drop-down menu shows Condensed when you decrease the space between characters and shows Expanded when you increase the space between characters. - Position
Character position, or baseline shift, allows raising or lowering the baseline of selected text without making any change to its size or appearance. - Kerning for fonts
Kerning refers to adjusting the space of some specific pairs of characters so they can occupy less space, for example: VA, Va, WA, Wa, etc.
OpenType Features
OpenType is a scalable font format developed by Microsoft. OpenType adds additional features that allow you to manipulate some of the more intricate aspects of fonts and number spacing. The Calibri font is one of the most popular OpenType fonts. We’ll discuss later in detail about the OpenType Features.
