
- Set left indent on Home tab.
Left indent adds extra space to the left of the entire paragraph. On theHometab, in theParagraphgroup, use theIncrease IndentandDcecrease Indentcommands. - Set left or right indent on Layout tab.
Right indent adds extra space to the the right of the entire paragraph. On theLayouttab, in theParagraphgroup, specify theLeftorRightindentation values in the Indent area. - Set First Line Indent
The “first line indent” adds extra space to the first line of a paragraph. Click at the begining of the paragraph, pressTabkeyboard button to set indent on the first line or pressShift+Tabkeyboard button to un-indent the first line. - Set Hanging Indent
The hanging-indent is opposite to the “first line indent”, it adds extra space to the left of the entire paragraph except the first line. Select paragraphs, pressCtrl+Tto set hanging indent or pressCtrl+Shift+Tto remove the hanging indent. - Mirror Indents
Use mirror indents, if you intend to print document on both side of the paper. - Set Indents with the ruler
You can set the First Line Indent, Hanging Indent, Left Indent, and Right Indent by dragging their markers on the horizontal ruler.
Indent Paragraph on Home tab
You can move the entire paragraph(s) away from the left margin by clicking the Increase Indent icon or move the entire paragraph(s) closer to the left margin by clicking the Decrease Indent icon in the Paragraph group on the Home tab.
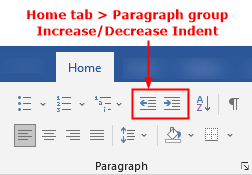
To increase the indentation of current or selected paragraphs:
- Click
Hometab - Click
Increase Indenticon in theParagraphgroup. - Or press keyboard shortcut buttons
Ctrl+M.
By default, increases a paragraph’s indent by 0.5 inch each time you use Increase Indent (or Ctrl+M) command.
To decrease the indentation:
- Click
Hometab - Click
Decrease Indenticon in theParagraphgroup. - Or press keyboard shortcut buttons
Ctrl+Shift+M.
By default, decreases a paragraph’s indent by 0.5 inch each time you use Decrease Indent (or Ctrl+Shift+M) command.
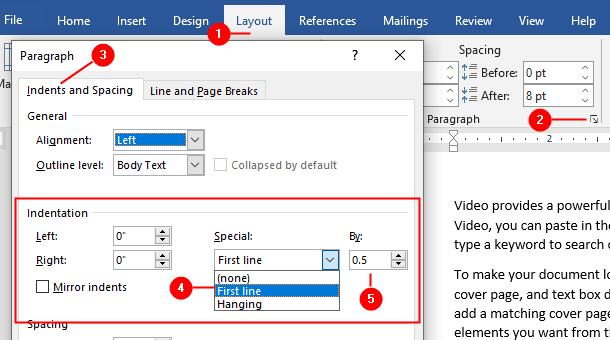
Indent Left or Right on Layout tab
The Increase Indent and Decrease Indent tools in Paragraph group on the Home tab, increases/decreases a paragraph’s indent by 0.5-inch. But the Indent area in Paragraph group on the Layout tab allows you to specify your own indent settings instead of the default 0.5-inch setting. The Indent area in the Layout tab also offers the Right indentation for the selected paragraphs:

- Click
Layouttab - In the
Indentarea of the Pargraph group, specify theLeftorRightdistance. - You can also specify the negative value (for example,
-0.5) if you need to set the indentation beyond the margins.
Indentation in Paragraph dialog box
Click on the Paragraph dialog box launcher icon from either the Home or Layout tab and make sure the Indents and Spacing tab is selected in the dialog box:

The Indentation area allows you to immediately set up Left, Right, First line, Hanging, or Mirror indents.
Indent First Line of Paragraphs
The first-line indent adds extra space to the first line of each paragraph to indicate the beginning of the paragraph. When you indent the first line, only the first line will move from the margin, the other lines will not move. To indent the first-line:
- Click on the beginning of an exising paragraph.
- And press
Tabbutton on the keyboard button. - Or press
Shift+Tabkeybaord shortcut to remove first line indent.
Or use the Paragraph dialog box:
- Click on
HomeorLayouttab - Click the paragraph dialog box icon in the
Paragraphgroup. - Select
Indents and Spacingtab on the Paragraph dialog box. - Click on
Speciallist and choose the “First line” from the menu. - Specify the indent space
0.25(or your desired value) inByfield or use Up and Down arrow to set the indent space. - Click
OKto apply the First Line indent on selected paragraphs.
Creating Hanging Indent
Hanging indentation is the opposite of the first-line indentation, it ident all lines except the first line of the paragraph. The hanging indent is usually used in indexes, bibliographies, etc. The Word’s lists (numbered and bulleted) also uses the hanging indentation. Follow these steps to set up hanging-indent:
- Select paragraphs
- Press
Ctrl+Tto set hanging indent - Or press
Ctrl+Shift+Tto remove the hanging indent
You can also specify the hanging indent in the Paragraph dialog box:
- Click on
HomeorLayouttab - Click the paragraph dialog box icon in the
Paragraphgroup. - Select
Indents and Spacingtab on the Paragraph dialog box. - Click on
Speciallist and choose the “Hanging” from the menu. - Click
Byfield and specify the indent space0.5(or your desired value) or use Up and Down arrow to set the indent space. - Click
OKto apply the Hanging indent on selected paragraphs.
Mirror Indents
Use Mirror indents formatting to create indents to accommodate duplex printing (printing on both sides of the paper):
When you checked the Mirror indents box in the Paragraph dialog box, the Left indent become Inside and Right indent become Outside:

To set up mirror indents:
- Select the text and click on
HomeorLayouttab - Click the paragraph dialog box icon in the
Paragraphgroup. - Select
Indents and Spacingtab on the Paragraph dialog box. - Check the
Mirror indentscheckbox and specify theInsideandOutsideindents. - Click
OK

To see how your documents looks after applying the Mirror indents, click View tab and click Multiple Pages icon in the Zoom group, see above figure.
Adjusting Indent with the Ruler
You also can adjust the indents with the use of the ruler by dragging the indent-markers (arrows) on the desired location.
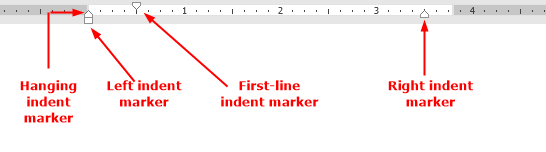
Understanding ruler indent marks/symbol:
- Adjusting Left Indent with Ruler
The left indent marker (arrow) will move the entire paragraph (all lines including first-line) by adding the extra space to the left of the paragraph. The first-line indent also move when you move the left indent. - Adjusting Right Indent with Ruler
The right indent maker (arrow) will move the entire paragraph by adding the extra space to the right of the paragraph. - Adjusting First Line Indent with Ruler
The first-line indent marker (arrow) will move the first line by adding the extra space to the left of the first-line. - Adjusitng Hanging Indent with Ruler
The hanging indent marker (arrow)will move all lines except the first line.
Troubleshooting
The ruler is not visible, how to activate the ruler?
The ruler may not visible if you are not in the Print Layout view or the Ruler is not activated. To make the ruler active:
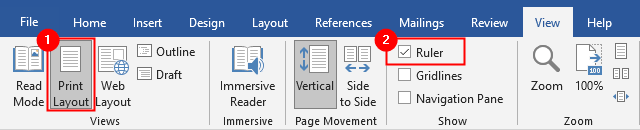
- Click on the
Viewtab. - Activate the
Print Layoutview inViewsgroup (if not activated). - Check
Rulerbox in theShowgroup.
