
When you open the World application, you see many features which include:
The title bar

On the very top of the Word window, the title bar is located which contains:
- Quick Access Toolbar (QAT)
- Current working document name
- Application name (Word)
- Office Online menu to manage your Microsoft account
Ribbon Display Optionsbutton for auto-hiding the ribbon, showing the tabs and commands
Quick Access Toolbar
To the left of the title bar, the Quick Access Toolbar (QAT) is located. QAT contains buttons to perform common tasks:
Savebutton for saving the current documentUndobutton for undoing your last actionRepeat(or Redo) button for repeating your last action- A small arrow at the end of Quick Acces Toolbar for customizing the QAT, as shown in the following figure:
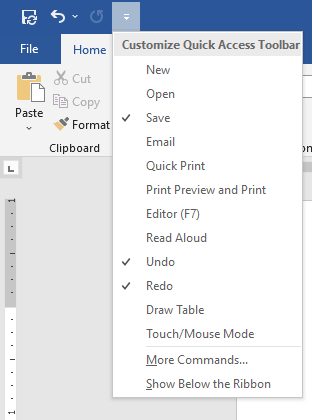
To add an item to the “Quick Access Toolbar” simply click the arrow key at the end of the toolbar and click on the name of the command that you want to add from the menu.
Ribbon
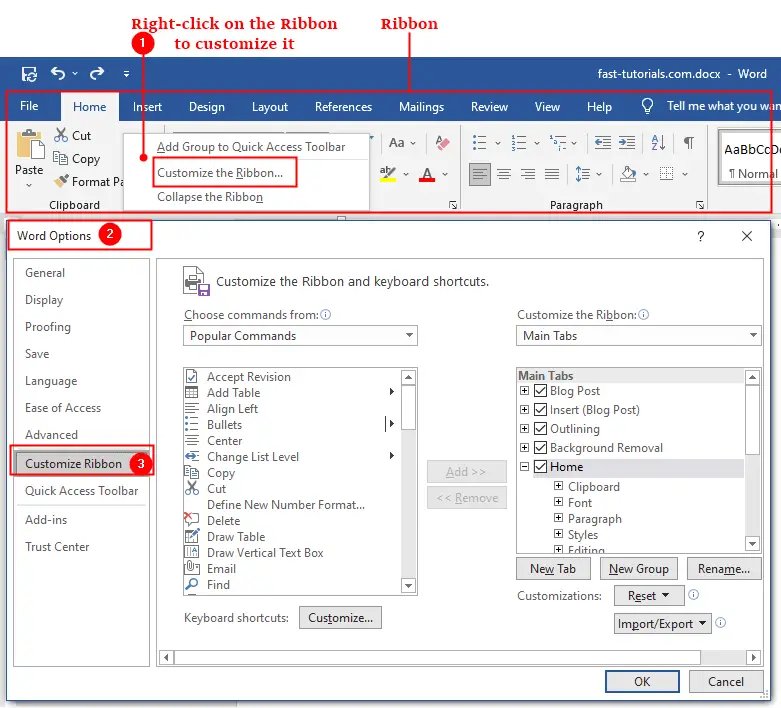
The ribbon contains Tabs and Commands. Each tab contains groups of related commands. The ribbon is customizable, you can add and remove groups and commands on it. You can also export your Ribbon Customizations and import them to another computer. To customize the Ribbon, click File tab and select Options or right-click on the Ribbon and select the “Customize the Ribbon” option, it will lead you to the Word’s Options dialog box with “Customize Ribbon“option selected:
How to Show and Hide Ribbon?
Right-click on the Ribbon and select Collapse the Ribbon. You can also customize the appearance of the Ribbon by clicking the Ribbon Display Options icon on the title bar, as shown in the following figure:
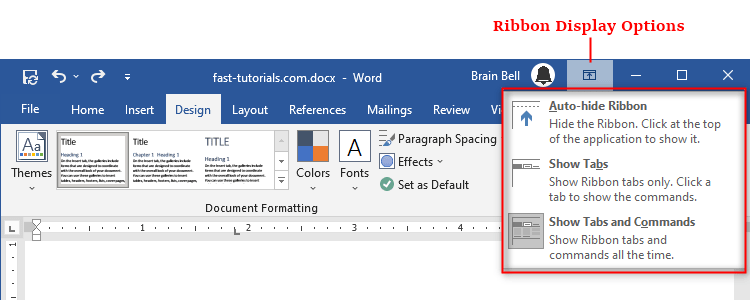
The Ribbon Display Options menu contains three options:
- Auto-hide Ribbon
Once you select this option, all the command and title bar will be hidden. - Show Tabs
Select this option to show only Tabs.
Note: Double-clicking on a tab will also hide the commands underneath it. Simply double-click on the tab to return the commands. - Show Tabs and Commands
Select this option to show both Tabs and Commands.
Tabs
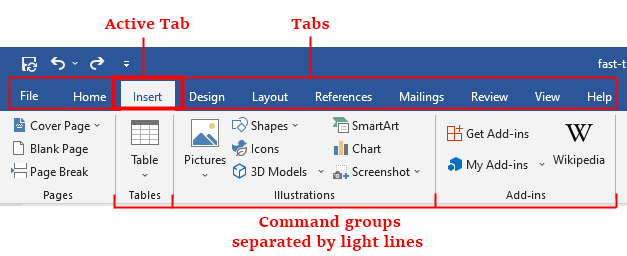
Tabs are located underneath the title bar. A tab is actually a menu bar that organizes Word features at the top of the application’s interface. When you click a tab, it shows commands contained in it. Double-clicking on a tab will collapse the commands, double-clicking again on a tab to return the commands.
Commands Groups
Each tab is arranged into sections known as groups to organize related commands. When you click a tab, you can see many command groups separated by light lines that define boxes around groups of icons. For example, the above figure showing the groups of Insert tab: Pages, Tables, Illustrations, and Add-ins.
Dialog Box Launcher
Dialog Box Launcher icon appears in the lower-right corner of many command groups on the Ribbon. Clicking this icon opens a dialog box or task pane that provides more options. For example, to access the Clipboard task pane, click on the group arrow, as shown:

Status bar

The status bar is located at the bottom of the Word. It Displays document information about the current document. The Status bar contains the number of the page on which you’re currently working, the total number of pages and total words in the document, the Proofing button, the View Shortcuts buttons, the Zoom Slider, and Zoom button.
Right-click on the status bar to display the shortcut menu, as shown:

To add or remove an item from the status bar, simply click on the desired option in the shortcut menu.
