
All Office applications have a Home tab, which is the default tab of all Office applications. The home tab in Microsoft Word has five groups of related commands:
Clipboard
When you writing a document, you might need to Copy some text, an image, or other item and Paste it in various places. Or, you might want to use the Cut command to move a piece of text or other item from its original location and Paste it elsewhere (see, Office Clipboard). Or, you might need to copy formatting and apply it on various pieces of text using the Format Painter.
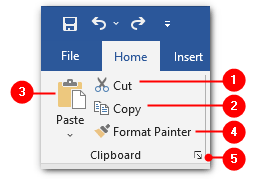
- Cut
TheCutcommand (Ctrl+X) cuts the selection and keeps it in the clipboard. - Copy
TheCopycommand (Ctrl+C) copies the selection to the clipboard. - Paste
The Paste command (Ctrl+V) pastes the contents from the clipboard to where you want them. The Paste command’s drop-down menu contains the following options:- Paste Options
The available options vary depending on the type of content that you have cut or copied to the Clipboard. - Paste Special
This option enables you to convert the format of pasted item. - Set Default Paste
Allows you to customize the behavior of paste command.
- Paste Options
- Format Painter
This command allows you to copy multiple formats from selected text to another, instead of repeating the formatting manually over and over. - Clipboard Task Pane
The Clipboard pane lists your copied items and allows you to paste any of its items into the current document.
Font
The options under this tab include font size, font type, increase and decrease font, bold, underline, and italic.

- Font
The Font drop-down menu provides the list of available fonts which you can apply to selected text. - Font Size
The Font Size drop-down menu allows you to set the size of selected text. - Increate Font Size
You can use this command (or keyboard shortcutCTRL+Shift+>) to increase the font size of the selected text to the next largest size. - Decrease Font Size
You can use this command (or keyboard shortcutCTRL+Shift+<) to decrease the font size of the selected text to the next smaller size. - Change Case
Use this command to change the case of selected text. You can also use the keyboard shortcutShift+F3to change the case of selected text. Clicking the Change Case command button displays the following options:- Sentence case
Capitalizes the first word in the selected text. - lowercase
Convert the selected text to lowercase. - UPPERCASE
Convert the selected text to uppercase (keyboard shortcutCtrl+Shift+A).
- Capitalized Each Word
Capitalizes the first letter of each word. - tOGGLE cASE
Reverses the case of each letter in the selected text.
- Sentence case
- Clear All Formatting
This command removes all the formatting from the selected text. - Bold
This command (keyboard shortcutCtrl+B) makes the selected text bold. - Italic
This command (keyboard shortcutCtrl+I) makes the selected text italic. - Underline
This command (keyboard shortcutCtrl+U) adds a line under the selected text. The Underline drop-down menu provides different types of lines (dotted, thick, dashed, etc.) which you can easily choose from. You also can change the color of Underline by using the drop-down menu. - Strikethrough
Strike through the selected text. It is commonly used to describe the previous or rejected text. - Subscript
Superscript text appears below the line, such as52. This command makes the selected text subscript, the keyboard shortcut isCtrl+=. - Superscript
Superscript text appears above the line, such as52. This command makes the selected text superscript, the keyboard shortcut isCtrl+Shift++. - Text Effects and Typography
You can use menu to apply formatting that makes the selected text look like a WordArt object. - Text Highlight Color
The command highlights a color (choose from the drop-down menu) to the text. You can activate this command without first selecting the text to randomly highlight the text. ChooseStop Highlightingfrom the drop-down menu or pressEsckey to deactivate this command. - Font Color
This command changes the color of the selected text. You can choose a custom color for your text from the command’s drop-down menu. - Font Dialog Box
PressCTRL+Dor click the dialog box launcher button in the bottom-right corner of the Font group to open the Font dialog box. This dialog box contains all your font-formatting in a neatly organized fashion.
Paragraph
The paragraph group contains lists (number, bulleted and multilevel), indent, sort, alignment, spacing and many more commands to set the look of a paragraph.
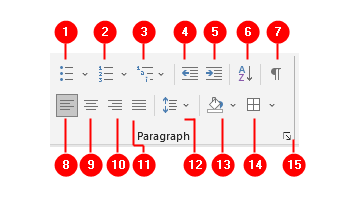
- Bullets
Create a Bulleted List. - Numbering
Create a Numbered List. - Multilevel List
Create a Numbered List with several levels. - Decrease Indent
This command moves the paragraph closer to the page margin (left-hand side) by decreasing the indent level. - Increase Indent
This command moves the paragraph farther from the page margin (right-hand side) by increase the indent level. - Sort
This command enables you to sort any text. Clicking Sort command button opens theSort Textdialog box where you can specify the details for the sort. - Show/Hide Formatting Symbols
Hide or show the enter key, spacebar, and other nonprinting characters. - Align Left
This command aligns the current paragraph (or a selection) to the left. You can use the keyboard shortcutCtrl+Lto left-align a paragraph (or a selection). - Center
This command aligns the current paragraph (or a selection) in the center of the page. To center a paragraph (or selection), pressCtrl+Ekeyboard shortcut. - Align Right
This command aligns the current paragraph (or a selection) the right. To right align a paragraph, pressCtrl+Rkeyboard shortcut. - Justify
The justify command is very useful for creating a professional document. Its lines-up neatly on the both sides of a paragraph. PressCtrl+Jkeyboard shortcut to justify a paragraph. - Line and Paragraph Spacing
This command allows you to allocate the space between lines of text or between paragraphs. - Shading
This command applies a color background shade behind a heading, a paragraph, or a table cell to draw your readers’ attention. - Borders
This command applies the border to the selected text. The Border command menu displays a list of border options. - Paragraph Dialog Box
Clicking the dialog box launcher opens the Paragraph dialog box with more detailed options for the commands in the group.
Styles
The styles group enables you to format a document more quickly and giving it a more professional look.
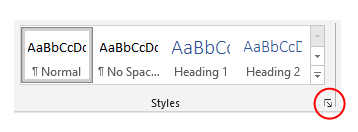
Style Pane
Click the dialog box launcher to display Styles pane. The Styles pane lists the recommended styles. This pane enables you to quickly preview styles and create new styles.
Editing
The Editing group helps you to select, find or replace the text, objects and formatting.
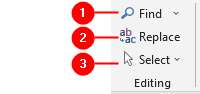
- Find
Clicking this command (or pressingCtrl+F) open the Navigation pane. The Find’s drop-down menu contains more options for finding text in your document:- Find
Opens the Navigation pane. The keyboard shortcut for this command isCtrl+F. - Advanced Find
Opens the Find and Replace dialog box withFindtab selected. - Go To
Open the Find and Replace dialog box withGo Totab selected.
This command enables you to easily find locations or objects in the document. The keyboard shortcut for this command isCtrl+G.
- Find
- Replace
Opens the Find and Replace dialog box with Replace tab selected. This command enables you to replace formatting, a specific word or phrase for another. The keyboard shortcut for this command isCtrl+H. - Select
- Select All
This command (or pressingCtrl+A) selects everything (text and objects etc.) in the current document. - Select Objects
Click this command button and drag a rectangle on the page to surround all the objects that you want to select. - Select All Text with Similar Formatting
This command enables you to quickly select the text that has similar formatting. - Selection Pane
Selection pane lists all the objects created by you. Using this pane you can select objects and make them visible or hidden in the current document.
- Select All
