The tab stop is a paragraph-level format. When you press the Tab key on the keyboard, the cursor jumps to a specific position on the page called “tab stop”. By default, the tab stop position is set to jump at 0.5-inch intervals when you press the Tab key but you can adjust the tab setting by using the Tabs dialog box or using the horizontal ruler.
Set Tabs with Tabs Dialog Box
First select the paragraphs and follow these steps to create a tab setting in the Tabs dialog box:
- Click the
Hometab. - In the Paragraph group, click the “dialog box launcher” button to open the Paragraph dialog box.
- Click the
Tabsbutton in the Paragraph dialog box. - Enter a position for the first new tab stop in the Tab Stop Position box. For instance, enter the number
1to set the tab stop1inch in from the left margin. - Choose an Alignment option to declare what kind of tab you want.
- Click the Set button.
- Repeat Steps 4 through 6 to create more tab stops.
- Click
OKwhen finished.
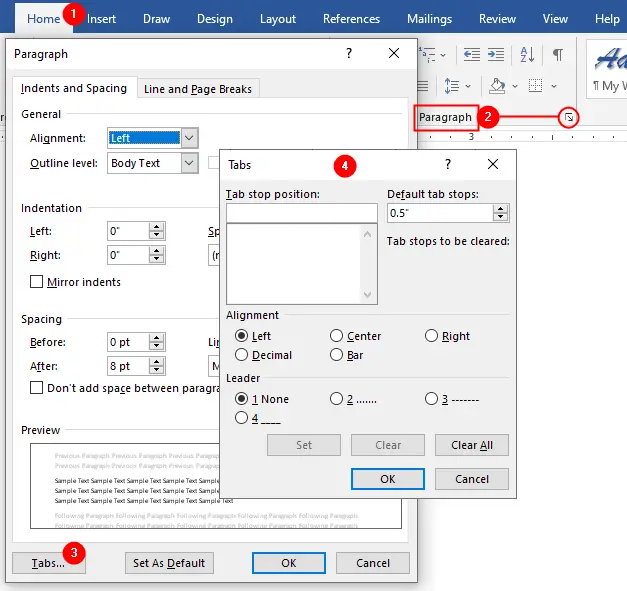
To remove a tab, select the tab in the Tab Stop Position list and click the Clear button. Clicking the Clear All button will remove all the tab stops.
Understanding Tabs Dialog Box
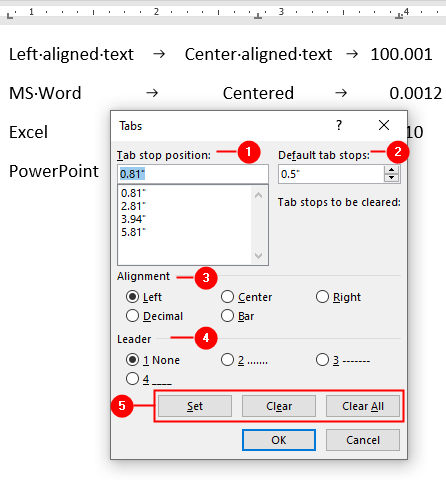
- Tab stop position
On the ruler bar, you can set the distance between tabs.
Set the tab stops position by creating the wider or smaller gaps between tabs. - Default tab stops
By default, the tab stop position is set to jump at 0.5-inch. You can change the default tab stop spacing for the selected paragraphs. For example, to set default tab stops for selected paragraphs to 0.75-inch intervals, type 0.75 in the box and then click the OK button. The default tab stops don’t appear on the ruler. - Alignment
Microsoft Word has five types of tab alignments to align text. The default alignment of tabs is set to left align. We’ll discuss Tabs Alignment in detail later in this tutorial. - Leader
Sometimes you need to fill a tab space with dots (or something else), Word offers three styles to separate the tab stops: dot, dash, and underline. We’ll discuss Leader Tabs in detail later in this tutorial. - The Tabs dialog box conains three contiguous buttons:
- Set button
Press this button to add a Tab setting in theTab stop positionlist. - Clear button
Select a Tab setting from theTab stop positionlist and press this button to remove it from the list. - Clear All button
Pressing this button removes all the tab stops settings.
- Set button
Tabs Alignment
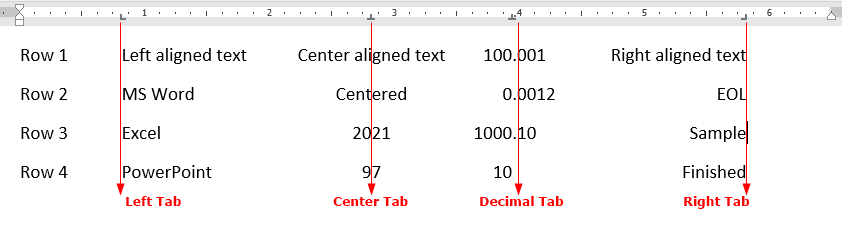
By default, tabs alignment is set to left-align, but you can choose different tab types from the ruler bar (or from the Tabs dialog box) to align the tabbed text.
- Left Tab
Aligns text to the left of the tab stop - Center Tab
The text will center under the tab stop - Right Tab
The text will line up to the right of the tab stop - Decimal Tab
If the text after the tab is a number with a decimal point, the decimal point will be lined up. - Bar Tab
A vertical bar appears in line with the tab stop.
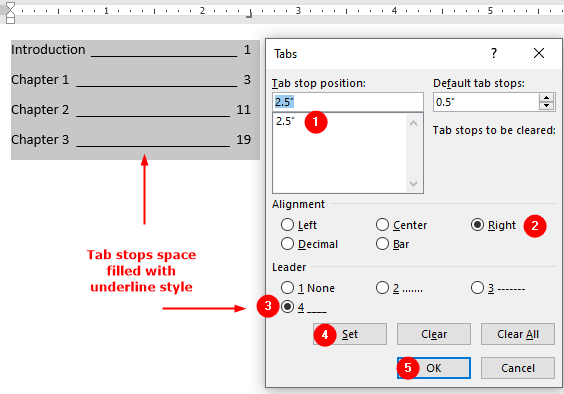
Leader Tabs
You can apply a leader to any tab stop in Word except the bar tab:
- Create a tabbed list
- Select the text
- Open the
Tabsdialog box (as described on the start of this tutorial). - Set the
Tab stop positionand set theAlignment. - In the
Leaderarea, choose the leader style. - Click the
Setbutton. - Repeat Steps 4 through 6 to create more tab stops.
- Click
OKto apply the changes.
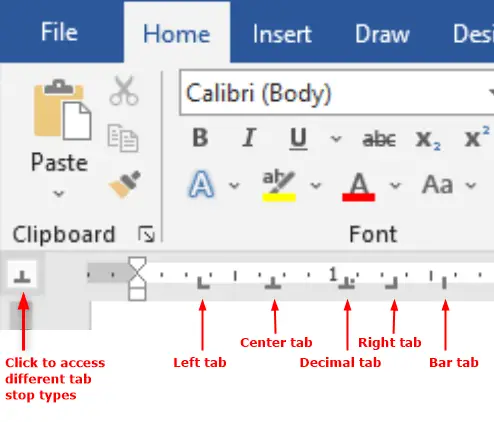
Set Tabs Using the Ruler
You can use the ruler to quickly set the tabs. Follow these steps if the ruler is not visible:
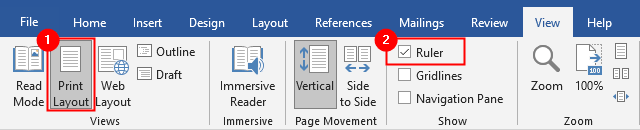
To make the ruler visible, click on the View tab, activate the Print Layout view in Views group (if not activated), and then check the Ruler box in the Show group as shown in the above figure.
Follow these steps to set tab stops using the ruler:
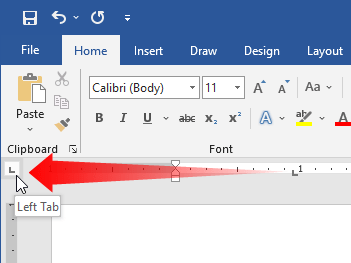
- On the top of vertical ruler, click the tab selector icon until the desired
tabtype appears. - Click the horizontal ruler at the location where you want to set the
tab. For instance, click the number1to set a tab stop1inch in from the left margin. - The
tabicon appears on the horizontal ruler.
You can adjust an existing tab by dragging the tab left or right with the mouse. To remove a tab from a paragraph, drag the tab up or down from the ruler.
