To format a table, use the Table Styles gallery which is available in Table Design subordinate tab on Table Tools tab, see the following figure:

The Table Tools tab appears on the Ribbon when you click in the table, it has two related subordinate tabs: Table Design and Layout. When you are finished working with the table, the Table Tools tab (and its subordinate tabs) disappears from the ribbon.
Apply a Table Style
- Click in the table or click its handle to select the entire table.
- Move to the Ribbon and on the
Table ToolschooseTable Designtab. - Then move to the
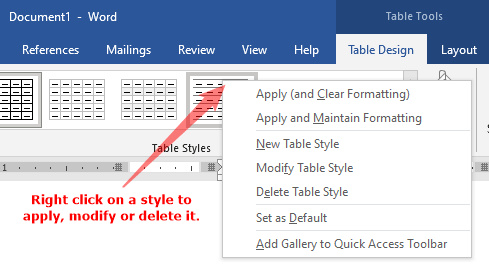
Table Stylesgroup and click theMoreicon to expand the Style gallery (as explained in the above figure). - Scroll within the style gallery, find and apply a pre-defined style for the table.
Create a New Table Style
- Click in the table.
- Move to the Ribbon and on the
Table ToolschooseTable Designtab. - Then move to the
Table Stylesgroup and click theMoreicon to expand the Style gallery (see above figure). - At the bottom of the expanded
Table Stylesgallery, clickNew Table Style..., see following figure:

The Create New Style from Formatting dialog box will be displayed. See the following figure:
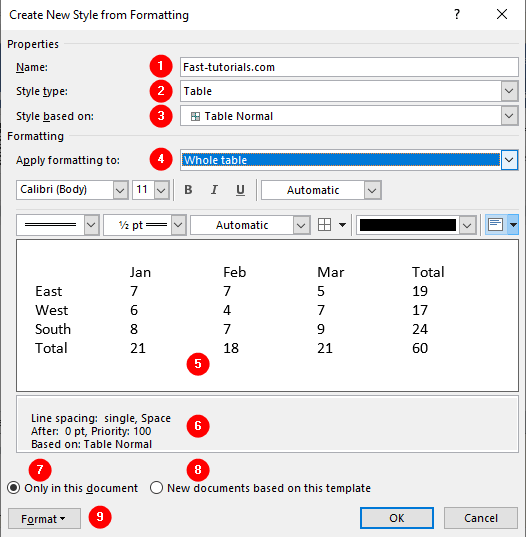
- Name:
Write a unique name for this style. - Style type:
Make sure the Table option is selected. - Style based on:
Select a table style from which it will inherit all other formatting options not implemented by this style. - Apply formatting to:
Select a specific table element from the list to apply formatting to it:- Whole table
Choose this option to apply formatting to the whole table. - Header row
Choose this option to apply formatting to the first row in the table. - Total row
Choose this option to apply formatting to the last row in the table. - First column
Choose this option to apply formatting to the first column in the table. - Last column
Choose this option to apply formatting to the last column in the table. - Odd banded rows
Choose this option to apply formatting to the 1st row, 3rd row, 5th row, 7th row and so on. - Even banded rows
Choose this option to apply formatting to the 2nd row, 4th row, 6th row, 8th row and so on. - Odd banded columns
Choose this option to apply formatting to the 1st column, 3rd column, 5th column, 7th column and so on. - Even banded column
Choose this option to apply formatting to the 2nd column, 4th column, 6th column, 8th column and so on. - Top left cell, Top right cell, Bottom left cell, Bottom right cell
Select each cell to apply individual formats to it.
- Whole table
- Preview area
This area helps you determine how the formatting looks like on a table. - Formatting detail
List all formats used by this style. - Only in this document
Style will only be available for this document. - New document based on this template
Selecting this option makes this style available for every new document if the template is same. TheNormal.dotmis the default template when you create a new document in Word. - Format
The Format button shows more formatting options, such as, Fonts, Paragraph, Tabs, Border, Language, Frame, Numbering, Language, Shortcut key, and Text Effects. Clicking any item from the menu will open the related dialog boxe to format the style.
Modify a Table Style
- Click in the table.
- Move to the Ribbon and on the
Table ToolschooseTable Designtab. - Then move to the
Table Stylesgroup. - Right-click on the desired style and select
Modify Table Styleoption (see above figure). - The Modify Style dialog box appears, see following figure:

To see the detail of the Modify Style dialog box, see create a new table style, as both dialog boxes contain the same formats, menus, and commands.
Table Style Options
The checkboxes in the Table Style Options group allow you to specify how the table style will be applied. When you check or uncheck an option, the thumbnails in Table Styles gallery are updated to reflect your choice. The Table Style Options group has six checkboxes:
- Header Row
Format the top row in the table. - First Column
Format the first column in the table. - Total Row
Check this option to format the last row if the table contains numeric totals. - Last Column
Format the last column in the table. - Banded Rows
Alternate rows color to create a horizontal striping effect. - Banded Columns
Alternate columns color to create a vertical striping effect.
To use Table Style Options, apply a table style and then click on a checkbox to apply or clear the formatting related to the checkbox. For example:

Click anywhere in the table and follow the instructions:
- To apply special formatting to the first or last row, check the
Header RoworTotal Rowcheckbox. - To apply special formatting to the first or last column, check the
First ColumnorLast Columncheckbox. - To apply banding to table rows or columns, check the
Banded RowsorBanded Columnscheck box.
More Tutorials on Word Styles:
- Apply, Create, and Modify Styles
Paragraph Style
Character Style
Linked (paragraph and character) Style
Table Style
List Style - Create and Modify Table Styles
Table Style Options - Apply a table border style
- Link list level to style
- Define New List Style
- Stop automatically update a style
- Create a Character Style
- Replace Styles in Attached Template
- Find and Replace Formatting and Style
