Shading Cells, Rows Columsns or Table
You can apply shading to individual cells, rows, columns, or to an entire table:
- Select cells, rows, or columns that you want to apply shade.
- Click
Shadingdrop-down in theTable Stylesgroup of theDesigntab. - Move the mouse pointer over a color to preview it on the selection.
- Click on a color to apply it on the selection.

Themes Color Vs. Standard Colors
You’ll see two color groups when you click the Shading button: Theme Color and Standard Colors. Theme colors automatically update whenever you apply a new theme to the document. Choose Standard Colors or More Colors options if you don’t want to change the color when a new theme is applied.
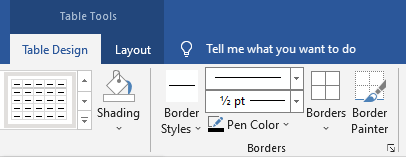
Table Borders
Apply, modify or remove border formatting on a cell, row, column, or the entire table. Use the Border Styles, Line Style, Line Weight, Pen Color, Borders tools, and Border Painter commands in the Table Design tab of Table Tools, as shown in the following figure:
- Border Styles
The borders style gallery. - Border Sampler
Copy border formatting to apply it elsewhere. - Line Style
Select a different line style format to replace the current borders. - Line Weight
Change the line weight, for example, one and a half point. - Pen Color
Change the border color by picking the desired color. - Borders
Add or remove the borders on the selection. For example, chooseNo Borderif you don’t to show the table borders. - Border Painter
Apply a border style, line style, line weight or color to any line you click on inside the table.
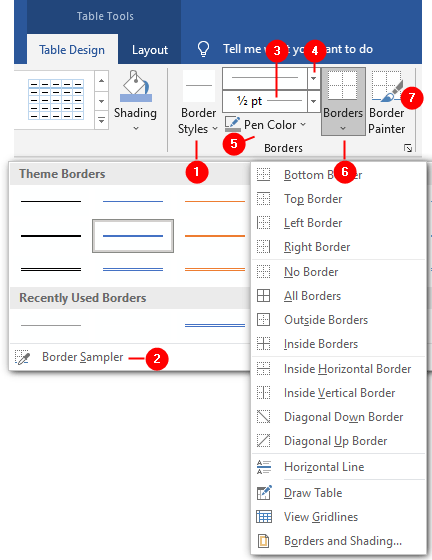
Apply a border style
- Select the cell, row, column, or entire table to apply borders.
- Click the
Table Designtab - Click the
Border Stylesbutton and choose a style in the gallery. - Click the
Line Style,Line Weight,Pen Color, etc. for further formatting. - Click the
Bordersdrop-down button, and then clickAll Borderoptions to apply borders to the entire selection.
Border Painter
Select border options from the “Table Tools > Table Design > Border group” and then use the Border Painter tool to draw in individual borders:
- Click the
Table Designsub-tab on theTable Toolstab. - Choose a line style from the
Line Styledrop-down menu. - Choose thickness from the
Line Weightdrop-down menu. - Choose border color from the
Pen Colordrop-down menu. - Click the
Border Paintericon if it is not selected automatically. - Drag mouse pointer over the table borders to paint those borders in the selected style, weight, and color.
Using Border Sampler to copy border formatting

Border Sampler option to copy border formatting- Click the
Table Designsub-tab on theTable Toolstab. - Click the
Border Stylesdrop-down menu. - Click
Border Sampleroption. - The mouse pointer converts to eyedropper.
- Move the eyedropper to an existing table.
- Click on the table’s border to copy its formatting.
- Use the Border Painter command to apply copied formatting to other borders.
Border and Shading dialog box
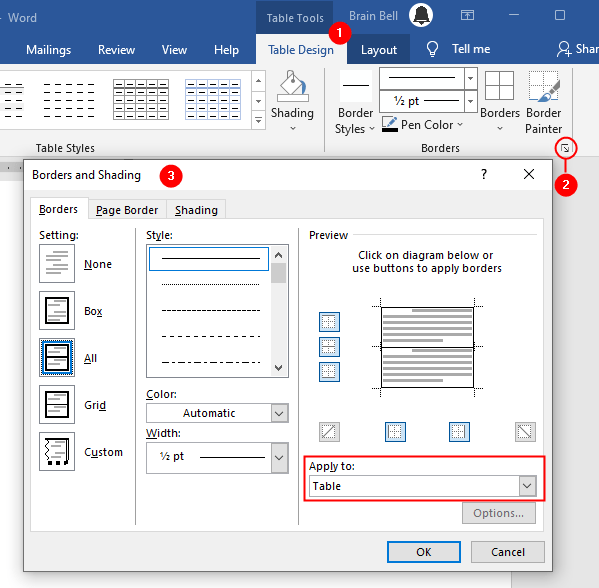
You can also use the Borders and Shading dialog box to apply and customize the borders and shading on a table:
- Select the Table.
- Click
Table Designtab, move mouse pointer toBordersgroup, and click dialog box launcher icon. - In the
Borders and Shadingdialog box, make changes according to your requirements. - Select
Tablefrom theApply todrop-down menu. - Click
OKto apply changes.
We’ll discuss the Border and Shading dialog box in detail later.
More “Working with Word Tables” Tutorials
- Insert Tables
- Insert and Delete Rows, Columns and Cells
- Wrap text around the table
- Table Borders and Shading
- Select Table, View Gridlines, Use Table Properties
- Resize tables, rows, columns, and cells
- Repeat heading rows on next pages
- Break, Split & Merge Cells, Rows, and Tables
- Set Table & Cell Alignment and Change Text Direction
- Use Formula in Tables and Paragraphs
