
Table Alignment
If the table size is narrower than the page margins (see AutoFit), you can align the entire table to the left, center, or right on the document:
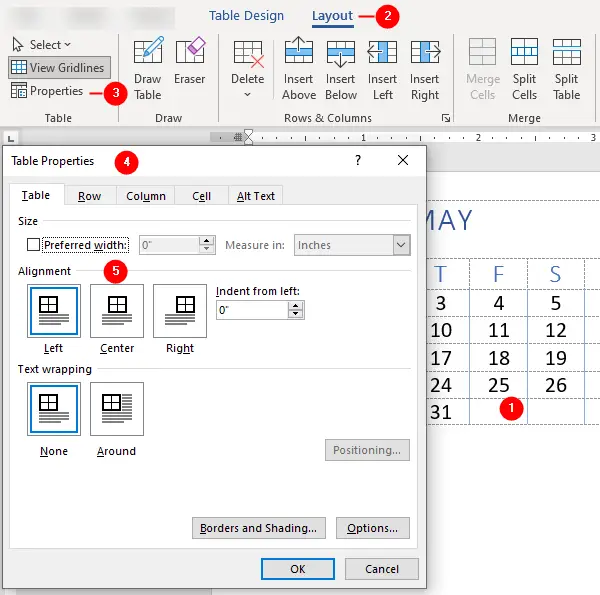
- Click in the table.
- Click
Layoutcontextual tab. - Click
Propertiesin theTablegroup. - The
Table Propertiesdialog box opens. - Click
Left,Center, orRightin the Alignment area. - Click
OK.
Indent from left
In the Table Properties dialog box, the Alignment area has an Indent from left option, this option allows you to define the table distance from the page left margin.
Cell Alignment
The Alignement group in Layout tab allows you to align text in cells horizontally and vertically. By default, Word aligns text at the top-left edge of each cell:
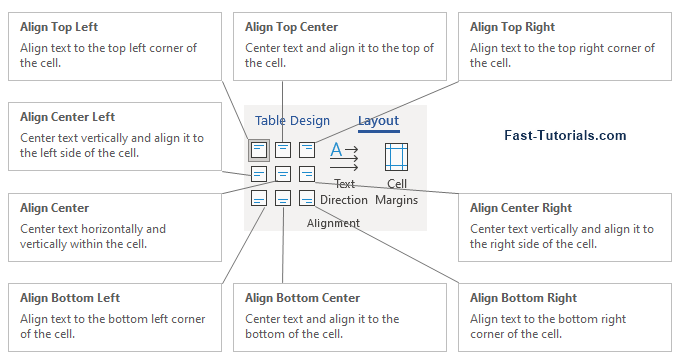
To align text in cells:
- Select cells you want to align.
- Click the
Layoutcontextual tab. - Click an alignment button from the
Alignementgroup (see above figure).
Change the Text Direction in a Cell
Rotating the text in a table cell gives more space to fit the content in the cell. The text in cells is displayed horizontally by default, to rotate it on a vertical axis, proceed as follows:
- Click on the cell or select cells to change the text direction.
- Click Text Direction button in the
Alignmentgroup on theLayoutcontextual tab.
Here’s what you can expect to happen:

- The first click on the
Text Directioncommand rotates the text vertically, with the text direction top to bottom (the text in the cell reads from top to bottom). - The second click rotates the text vertically, with the text direction bottom to top (the text reads from bottom to top).
- The third click puts the text back to normal.
Set Cell Margins
You can set margins in table cells to make table information easier to read. The Cell Margins command allow you to set the cell margins (space between cells border and text) and cell spacing (space between each cell): See how to set the cell margins and spacing:
- Click any cell in the table.
- Click the
Layoutcontextual tab. - Click
Cell Marginscommand in theAlignmentgroup. - Set margin settings in the
Table Optionsdialog box. - Click
OKto apply changes.
The Table Options dialog box:

Cell Margins button to open Table Options dialog box- Default cell margins
Top
Add margin from the top of the cell border.Bottom
Add margin from the bottom of the cell border.
Left
Add margin from the left of the cell border.Right
Add margin from the right of the cell border.
- Default cell spacing
Allow spacing between cellsCheck this option and define a space amount to add space around each table cell.
- Options
Automatically resize to fit contentsIf this option is checked, table row height and column widths are automatically resized whenever you write or delete text in a cell.
More “Working with Word Tables” Tutorials
- Insert Tables
- Insert and Delete Rows, Columns and Cells
- Wrap text around the table
- Table Borders and Shading
- Select Table, View Gridlines, Use Table Properties
- Resize tables, rows, columns, and cells
- Repeat heading rows on next pages
- Break, Split & Merge Cells, Rows, and Tables
- Set Table & Cell Alignment and Change Text Direction
- Use Formula in Tables and Paragraphs
