Insert rows
Follow one of the below steps to insert more rows in the existing table:
- To insert a new row at the end of the table, click in the last cell of the last row, and then press the Tab key to insert a new row.
- Move the mouse pointer to the left side of the table and then move the pointer between the rows where you want to insert a new row. A plus sign appears, click that plus sign to insert a new blank row.
- Right-click any cell where you want to make the insertion. In the context menu, choose the
Insertsub-menu and then clickInsert Rows AboveorInsert Row Belowoption. - Click any cell in the table where you want to make the insertion. Then on the
Layoutcontextual tab, in theRows & Columnsgroup, click theInsert AboveorInsert Belowbutton.
Note: To insert multiple rows, select the number of existing rows then click theInsert AboveorInsert Belowbutton.
Insert Columns
Follow one of the below steps to insert more columns in the existing table:
- Move the mouse pointer to the left top of the table and then move the pointer between the columns where you want to insert a new column. A plus sign appears, click the plus sign to insert a new blank column.
- Right-click any cell where you want to make the insertion. In the context menu, choose the
Insertsub-menu and then clickInsert Columns to the RightorInsert Columns to the Leftoption. - Click any cell in the table where you want to make the insertion. Then on the
Layoutcontextual tab, in theRows & Columnsgroup, click theInsert LeftorInsert Rightbutton.
Note: To insert multiple columns, select the number of existing columns then click theInsert LeftorInsert Rightbutton.
Insert Cells
To insert a new cell in a table:

- Right-click any cell in the where you want to make the insertion.
- Hover mouse pointer over the
Insertsub-menu and then clickInsert Cellsoption. - The
Insert Cellsdialog box will appear.
(Or; on theLayoutcontextual tab, in theRows & Columnsgroup, click the dialog box launcher icon to display theInsert Cellsdialog box). - Select
Shift cells rightorShift cells downoption. - Press
OKto insert the cell.
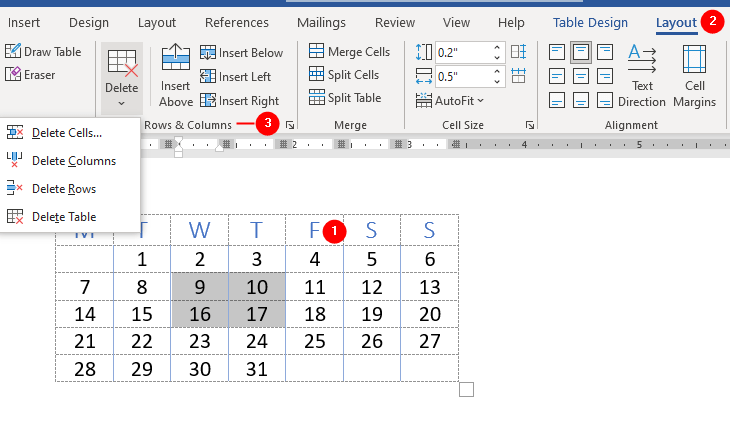
Delete Rows
Follow one of the below directions to delete rows in the table:
- Select the rows, right-click to display the context menu, and click
Delete Rowsoption. - Click any cell in the row, and on the
Layoutcontextual tab, in theRows & Columnsgroup, click theDeletedrop-down and then clickDelete Rows.
Delete Columns
Follow one of the below directions to delete columns in the table:
- Select the columns, right-click to display the context menu, and click
Delete Columnsoption. - Click any cell in the column, and on the
Layoutcontextual tab, in theRows & Columnsgroup, click theDeletedrop-down and then clickDelete Columns.
Delete Cells
To remove cells, follow these directions:
- Select cells.
- Click
Layoutcontextual tab. - In the
Rows & Columnsgroup, click theDeletedrop-down button. - Choose
Delete Cellsto display the Delete Cells dialog box.
(Or, right-click on the selection and chooseDelete Cellsfrom the context menu). - Select
Shift cells leftorShift cells up. - Click
OK.
More “Working with Word Tables” Tutorials
- Insert Tables
- Insert and Delete Rows, Columns and Cells
- Wrap text around the table
- Table Borders and Shading
- Select Table, View Gridlines, Use Table Properties
- Resize tables, rows, columns, and cells
- Repeat heading rows on next pages
- Break, Split & Merge Cells, Rows, and Tables
- Set Table & Cell Alignment and Change Text Direction
- Use Formula in Tables and Paragraphs
