- Click on the table to select it.
- The contextual
Table Toolstabs,Table DesignandLayout, appear on the ribbon. Click theLayouttab. - On the left-hand side of the ribbon, in the
Tablegroup, clickPropertiesbutton. - The
Table Propertiesdialog box will be displayed. - In the
Text wrappingarea, chooseAroundoption, the text outside the table wraps around the table if the table width is smaller than the document’s margins.
Note: By default, the None option is selected. When the None option is selected, the table is placed on its line.
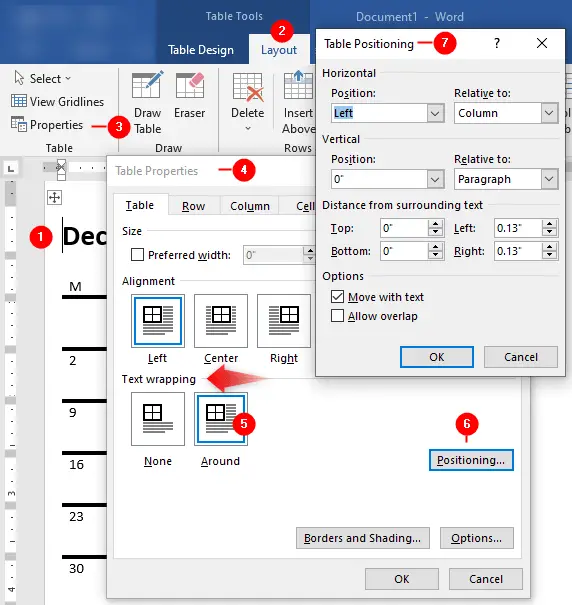
Table Positioning
When you choose the Around option in the Table Properties dialog box, the Positioning button becomes available:
- In the
Table Propertiesdialog box (see above figure), click thePositioningbutton to open the “Table Positioning” dialog box. - Position the table however you want within the text using the “Table Positioning” dialog box.
The Table Positioning dialog box enables you to control the table position in the document:
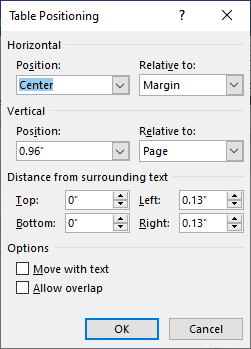
Let’s adjust the measurements:
- Horizontal
- Position:
The table’s horizontal position, chooseLeft,Right,Center,Inside, orOutsideposition. - Relative to:
The element to which the table’s horizontal position is relative to, chooseMargin,Page, orColumn.
- Position:
- Vertical
- Position:
The table’s vertical position, chooseTop,Bottom,Center,Inside, orOutsideposition. - Relative to:
The element to which the table’s vertical position is relative to, chooseMargin,Page, orParagraph.
- Position:
- Distance from surrounding text
Set the space you want to leave between the table and surrounding text. - Options
- Move with text:
Check this box if you wan to move the table with text when it is reformatted. If unchecked,the table will stay fixed in its place. - Allow overlap:
Allow the text to overlap the table boundary.
- Move with text:
Tips
Wrap text around the table by dragging the table
When you drag a table (by using its top-left handle) to a different position, the text wrapping option in the Table Properties dialog box will automatically change to Around:
How to place the table on its own line
Click on the table and open the “Table Properties” dialog box, choose Table tab and click None option under the Text wrapping area.
More “Working with Word Tables” Tutorials
- Insert Tables
- Insert and Delete Rows, Columns and Cells
- Wrap text around the table
- Table Borders and Shading
- Select Table, View Gridlines, Use Table Properties
- Resize tables, rows, columns, and cells
- Repeat heading rows on next pages
- Break, Split & Merge Cells, Rows, and Tables
- Set Table & Cell Alignment and Change Text Direction
- Use Formula in Tables and Paragraphs
