To replace Heading 2 with Heading 1, you can easily scroll through the text to find another Heading 2, click to select it, and press Ctrl+Alt+1 to apply its Heading 1 style. This operation can be easily accomplished if the document has just a few pages. But if the document has hundreds of pages, you would probably spend a long time scrolling through the text, finding every Heading 2, and applying the Heading 1 style.
But there is a better way:
- Click
Home > Replacecommand, found in theEditinggroup, to show theFind and Replacedialog box withReplacetab selected (or pressCtrl+H). - Click
More>>button to expand the Find and Replace dialog box. - Click the
Find whatbox. - Click
Format > Styleto show theFind Styledialog box. - Select
Heading 2style and pressOKto return to the Find and Replace dialog box. Under theFind whatbox you will now seeStyle: Heading 2. - Click the
Replace withtext box. - Click
Format > Styleto show theReplace Styledialog box. - Select
Heading 1style and pressOKto return to the Find and Replace dialog box. Under theReplace withbox you will now seeStyle: Heading 1. - Press
Replace Allto make the desired style changes.

Replace all instances of a style using the Style pane
You can easily select all instances of a style to replace with another by using the Select All Instances feature in the Styles pane. For example, you might want to select all instances of Heading 2 style because you want to replace Heading 2 style with Heading 1. Follow these steps to access Select All Instances of Style Name:
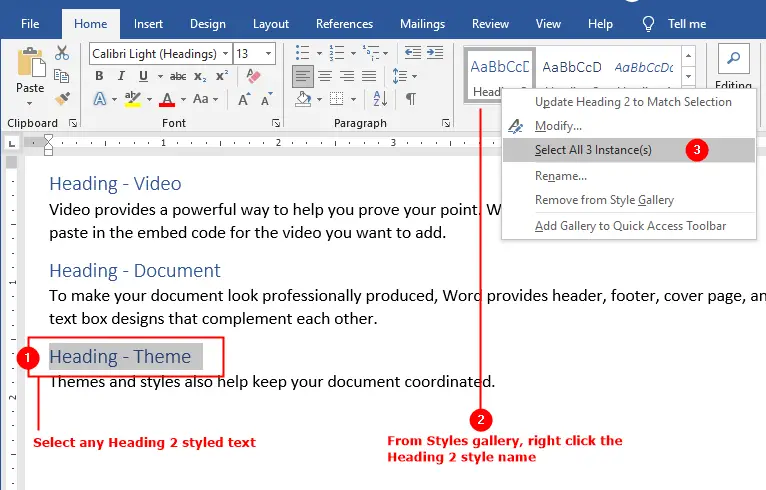
- Select any
Heading 2styled text. - On the
Hometab, right-clickHeading 2style name in the Style gallery. - Click
Select All n Instance(s)to choose all instances ofHeading 2style. - Click
Heading 1style name in the Styles pane to replace the styles all at once.
More Tutorials on Word Styles:
- Apply, Create, and Modify Styles
Paragraph Style
Character Style
Linked (paragraph and character) Style
Table Style
List Style - Create and Modify Table Styles
Table Style Options - Apply a table border style
- Link list level to style
- Define New List Style
- Stop automatically update a style
- Create a Character Style
- Replace Styles in Attached Template
- Find and Replace Formatting and Style
