In this tutorial we’ll discuss the following topics:
In previous tutorials, Character Formatting and Paragraph Formatting, you’ve learned about direct formatting. Direct formatting has some disadvantages, the big disadvantage is you have to repeatedly apply the same formatting commands to a particular recurring text. For example, you’ve applied bold formatting to the company name in the whole document. Later you want to remove the bold formatting and apply the italic formatting instead, in this case, you have to manually find and reformat each instance of the company name.
To solve this problem, create a new style and assign it to each instance of the company name, just modify the style whenever you need to change the format and all company name instances would immediately display the new formatting. It is in this way that styles can make formatting your document quicker.
Using styles you can easily apply single or multiple formats at once to text. When you apply a style to text, that text is formatted with all the formats defined in the style (such as font size, line space, etc.). Microsoft Word has many built-in styles, available on the Home tab in the Styles group, that you can use to format text.
Styles Gallery
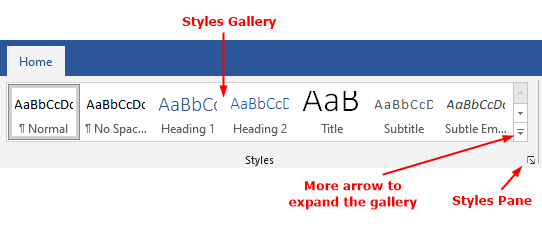
The Style gallery, on the Home tab in the Styles group, shows some recommended styles. Each style has a meaningful name that helps you to understand where it should apply in the document. Let’s discuss the most used styles in the Style gallery:
Normal Style
It is the most used paragraph style which uses an 11-point Calibri font, l.08 line-spacing, and 8pt spacing after the paragraph. Normal style is Word’s default style, every new document has a blank paragraph formatted with the Normal style unless you apply another style. Also, if you do not specify a style for the text you type, Word applies the Normal style to the text.
To apply Normal style to a paragraph that has a different style, use one of the following methods:
- First position the insertion point in the paragraph and click
Normalin the Styles gallery, - Click the
Clear All Formattingbutton in theFontgroup on theHometab or clickClear Formattingoption on the expanded Styles gallery, or - Use the keyboard shortcut
Ctrl+Shift+N.
No Spacing Style
No Spacing style formats line spacing as single and does not insert any additional space between lines when you press the enter key. To apply this style to a paragraph, first position the insertion point in the paragraph and click No Spacing in the Styles gallery.
Heading 1, Heading 2 Styles
By default, Style gallery displays two styles for headings: Heading 1 for the top-level headings and Heading 2 for second-level headings. Use the following keyboard shortcuts for heading styles:
- Press
Ctrl+Alt+1forHeadng 1style - Press
Ctrl+Alt+2forHeadng 2style - Press
Ctrl+Alt+3forHeadng 3style
Note: The hidden heading styles (Heading 3, Heading 4, and so on) are displayed on the Style gallery when you apply the previous style, for example, when you apply the Heading 2 style to a paragraph the hidden Heading 3 style appears on the Style gallery.
Apply Styles to Text
To apply a style, click the Home tab, on the Style gallery, choose the style you want to apply to the text. For example, you can apply the Heading 1 style to headings at the top level, Heading 2 style to headings at the second level, and so on in your document.
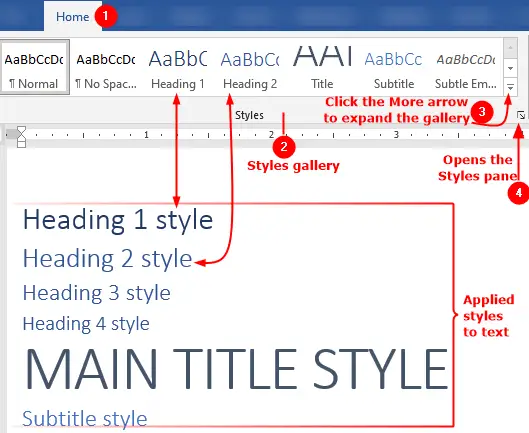
Scroll through the list of styles using the up and down scroll buttons at the right side of the gallery to find the desired style in the Style gallery, or click the More drop-down arrow to expand the gallery to see all recommended styles (see point 3 on the above figure). The expanded gallery also shows three command buttons:
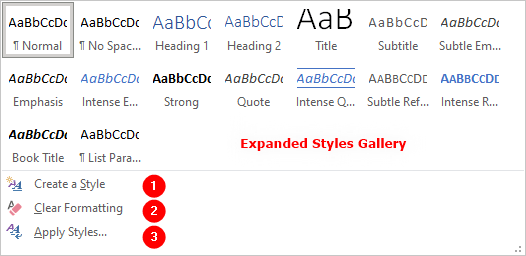
- Create a Style
Use this command to quickly create a style based on the formatting of the selected text. - Clear Formatting
Removes all formatting from the selected text and returning the formats to the Normal style. - Apply Styles
Opens the Apply Styles pane. You also can display this dialog box by pressingCtrl+Shift+Skeyboard buttons.
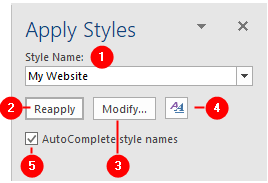
- Select the style from the
Style Namedrop-down list Reapplybutton applies the same style again on the selection and removes the direct formatting changes.- Click
Modifybutton to modify a style, the Modify Style dialog box will displayed. - Click this icon to open the Styles pane.
- Check
AutoComplete style namesbox to easily find a style when you type sytle’s name initials in theStyle Namebox.
Create a Style
Write a sample text and apply some formatting to it, such as change the font and its size, adjust paragraph and line-spacing, make the text bold or italic, etc. After completing the formatting follow these steps:
- Select the text you have just formatted.
- Click on the
Hometab, move to the styles gallery (in the Styles group) - Click the
Moreicon to expand the style gallery. - Click
Create a Stylecommand at the bottom of the gallery. - The
Create New Style from Formattingdialog box will displayed. - Write a unique and meaniningful name for the style in the
Namefield. - Choose a suitable style type from the Style type menu. (See, How to select a Style Type).
- Click
OKto save the style.
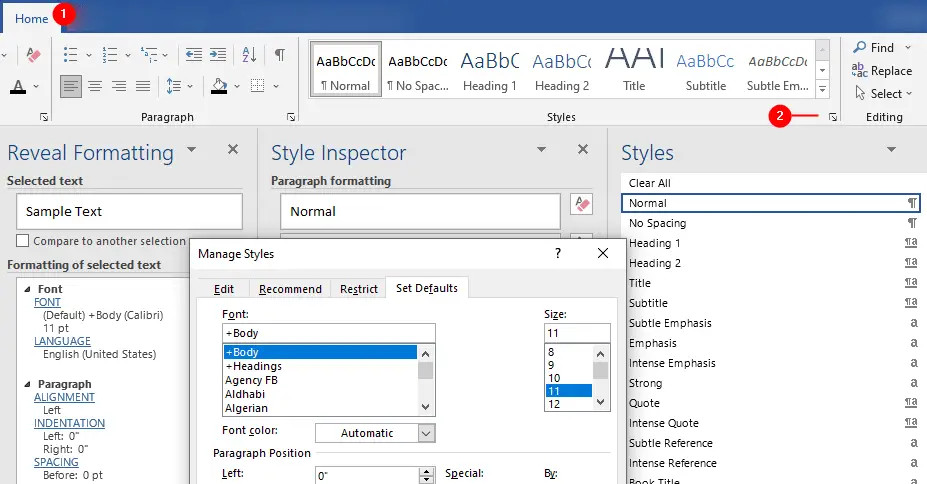
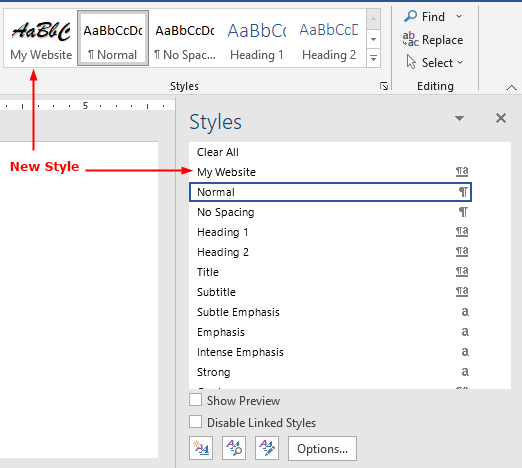
The style you have just created will be available in the Styles gallery and Styles pane, see the following figure:
Modify a Style
To modify a style, use the following methods:
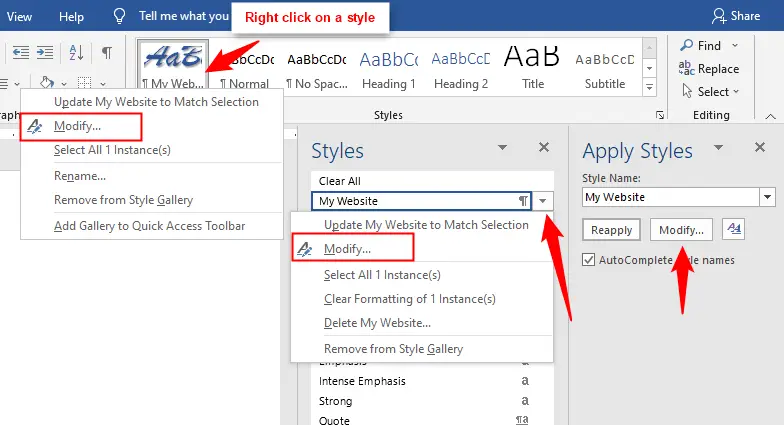
- In the Styles gallery or in the Styles pane, right click the style name and select
Modifycommand, or - In the Styles pane, mouse over the style you wish to change, click the down arrow and select
Modifycommand. - Open the Modify Style pane (press
Ctrl+Shift+S), select the style from the Style Name drop-down list, and then clickModify.
Microsoft Word will open the Modify Style dialog box where you can change the style properties (such as style name and style type…), formatting, visibility, etc.:
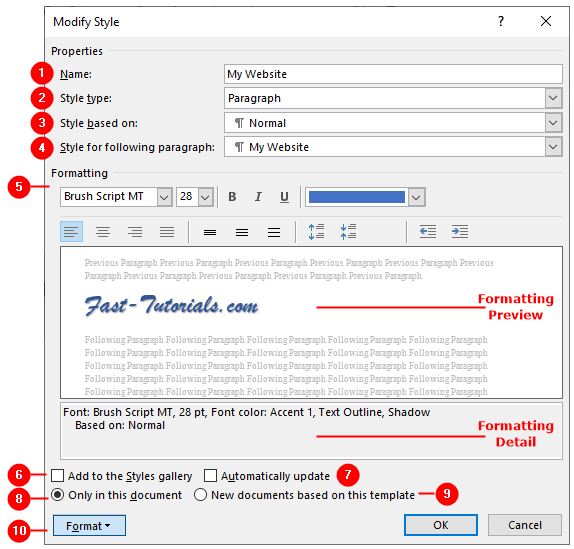
- Name
The style name box allows you to assign a different style name. - Style type
Choose between Character, Paragraph, Linked, Table, and List (you can not change the type of each style). - Style based on
Select a style from which it will inherit all other formatting options not implemented by this style. - Style for following paragraph
Choose which style would apply to the next paragraph when you press Enter in the paragraph formatted with this style. - Formatting
Use the Formatting area to change the appearance of style by changing its Font and Paragraph settings. - Add to the Style gallery
Check this box if you want to make the style appear in the Style gallery. - Automatically update
Check this box to have Word automatically update the style when you make direct formatting changes. The change then appears in all other instances of text that have the same style. - Only in this document
This option is selected by default. When this option is selected, the style will only be available for this document and will not be available for new documents. - New documents based on this template
Choose this option to save this style in the document’s template. Now every new document based on the similar template as the current document has, can see use this style. Choosing this option makes this style available for every new document if your current document is based on theNormal.dotmtemplate (the default template for Word document). - Format
The Format button shows more formatting options, such as, Fonts, Paragraph, Tabs, Border, Language, Frame, Numbering, Language, Shortcut key, and Text Effects. Clicking any item from the menu will open the related dialog boxe to format the style.
Style Types
Microsoft Word has five types of styles that represent the various formatting commands to format different document elements. The five types of styles are:
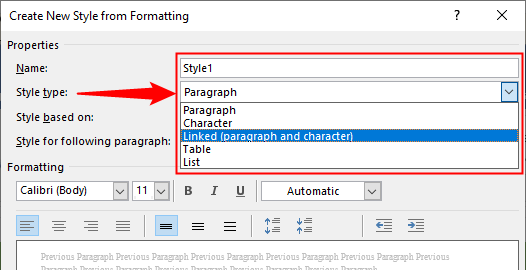
- Paragraph
- Character
- Linked
- List
- Table
1. Paragraph Style
It’s the most common style, applied to the entire paragraphs, not to individual words or a selection of characters. It includes both font and paragraph formatting. When you want to apply a style to a single paragraph, you don’t need to select it, just click on the paragraph you want to style and then apply the desired style.
2. Character Style
Character styles only change the format of characters. A character style contains character formatting commands such as font, size, bold, italic, underline, text color, subscript, superscript, etc. Character styles do not format the whole paragraph, but rather, change the format of individual characters, letters, words, or phrases. Character styles and paragraph styles can be used together and a character style overwrites the character formatting applied by the paragraph style.
3. Linked (paragraph and character) Style
A linked style is a combination of paragraph and character style that can be applied to either individual text or entire paragraphs, the difference depends on what text is selected when the style is applied. For example:
- Linked style applies character style (only font formats) if you select text less than an entire paragraph.
- Linked style applies paragraph style (both font and paragraph formats) if you select the entire paragraphs.
- Linked style applies paragraph style if nothing is selected in the paragraph.
4. Table Style
A table style applies only to tables. It includes character and paragraph formats plus you can format the whole table or its specific elements: such as header row, total row, first column, last column, alternating rows or columns (banded rows or column), top-left or bottom-left cell, top-right, or top-left cell.
To format a table or to create a new table style, use the Table Styles gallery which is available in Table Design subordinate tab on Table Tools tab. See, How to Create and Modify Table Styles.
5. List Style
A list style can apply only to a bulleted or a numbered list. A list style formats the list items, set indentation, and the way the list is presented. To create a new list style, click the Home tab, click the Multilevel List icon on the Paragraph group, and choose Define New List Style from the menu. See, How to Create a New List Style.
More Tutorials on Word Styles:
- Apply, Create, and Modify Styles
Paragraph Style
Character Style
Linked (paragraph and character) Style
Table Style
List Style - Create and Modify Table Styles
Table Style Options - Apply a table border style
- Link list level to style
- Define New List Style
- Stop automatically update a style
- Create a Character Style
- Replace Styles in Attached Template
- Find and Replace Formatting and Style
