
You create a paragraph when you press Enter key while writing a document in Word. In Word, a paragraph can be a title, heading, a single character, word, sentence, or even a blank line followed by the keyboard Enter key. Word uses ¶ marks to indicate paragraphs in your document.
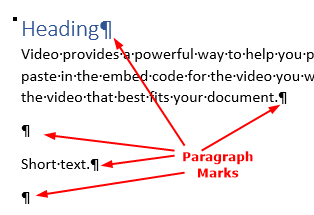
A paragraph has a formatting mark that is hidden by default. To see the paragraph mark, click ¶ icon in the Paragraph group on the Home tab. See, How to show formatting marks?
Microsoft Word provides paragraph-formatting tools in Paragraph groups located inside the Home tab and Layout tab. You can adjust the paragraph alignment, line spacing, paragraph space before and after, etc. through commands available in the Paragraph group on the Home tab. The Paragraph group in the Layout tab enables you to control the indent and spacing for the paragraph.
Paragraph Formatting Tools on Home Tab
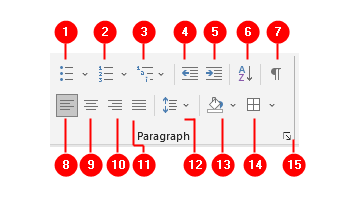
- Bulleted List
See also, Bullets and Numbering tutorial. - Numbered List
- Multilevel List
See also, Understanding Multilevel List dialog box and Multilevel Headings. - Decrease Indent
Remove the extra space (half-inch) to the left of the entire pargraph. - Increase Indent
Adds half-inch extra space to the left of the entire pargraph. - Sort
Sort hedings, paragraphs, lists or tables. - Show/Hide Formatting Symbols
- Left Alignment
Aligns the current paragraph (or a selection) to the left. - Center Alignment
Aligns the current paragraph (or a selection) to the center of the page. - Right Alignment
Aligns the current paragraph (or a selection) to the right. - Justified Alignment
Lines-up text neatly on the both sides (left and right) of the current paragraph (or a selection). - Line and Paragraph Spacing
Adjust the space between lines of text or between paragraphs. - Shading
Apply background color to a paragraph, selected text or table cell. Click down-arrow onShadingicon to open its menu to choose a preset color or create your own color. Shading command can be apply to selected text or an entire paragraph while theText Highlight Colorcommand doesn’t apply to an entire paragraph.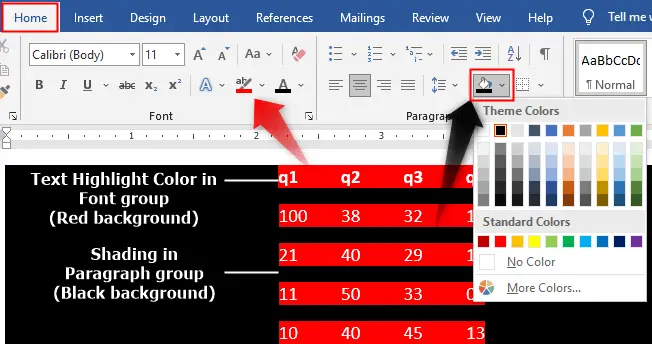
Shading command also apply the background color on paragraph-spacing. - Borders
Set border to the selected text, paragraph or table. - Paragraph Settings (Dialog box launcher)
Click on theDialog Box Launchericon to open the Paragraph dialog box. It gives you more formatting commands: Outline level, Tabs setting, Line and Page Breaks commands (we’ll discuss these commands later).
Paragraph Formatting Tools on Layout Tab
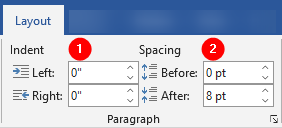
The Paragraph group on the Layout tab has two areas: Indent and Spacing. You can adjust the indentation on selected paragraphs by specifying the value in the Left and Right fields. Similarly, you can adjust the spacing on selected paragraphs by specifying the values in Before and After fields. For details follow these links:
Text Alignment
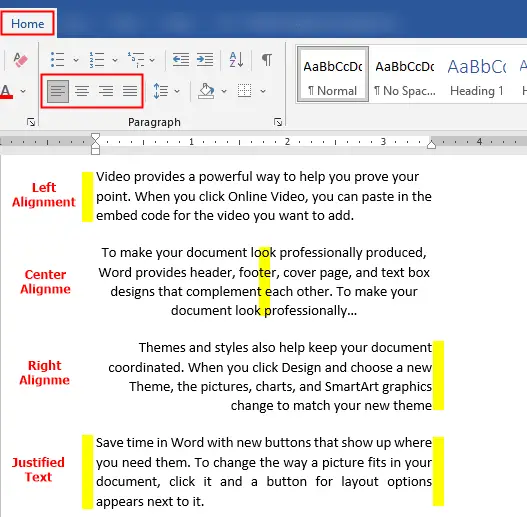
Paragraph alignment controls how the text aligns to the page margins. There are four types of alignment options in Word: Left, Center, Right, and Justify.
Left Alignment
It is the default paragraph alignment and is used by the majority of people. To align the paragraph to the left:
- Select text.
- Click the
Align Leftcommand on theParagraphgroup under theHometab to align text to the left. - Or press
Ctrl+Lkeyboard shortcut.
Center Alignment
Center alignment is mostly used for Heading or Title that begins on a new document page. To center a text:
- Select text.
- Click the
Centercommand on theParagraphgroup under theHometab to center text on the page. - Or press
Ctrl+Ekeyboard shortcut.
Right Alignment
Right alignment position the text to the right edge of the document, this alignment mostly use for signatures or citation credits. Follow these steps to right-align text on a document:
- Select text.
- Click the
Align Rightcommand on theParagraphgroup under theHometab to align text to the right. - Or press
Ctrl+Rkeyboard shortcut.
Justify Text Alignment
The Justify alignment places the text to both edges (left and right) by adding some additional space between words. To justify text, follow these steps:
- Select text.
- Click the
Justifycommand on theParagraphgroup under theHometab to justify text on the page.. - Or press
Ctrl+L(orCtrl+J) keyboard shortcut.