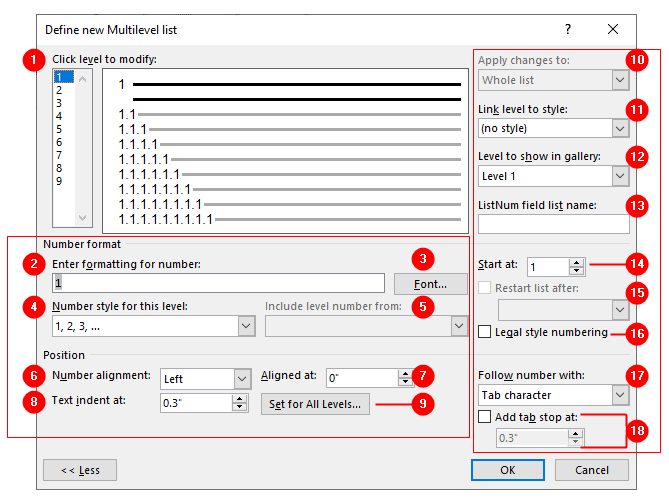
Click Home tab > Paragraph group > Multilevel List button to display the “Define new Multilevel list” dialog box to customize the each level:
- Click level to modify:
At the top left of this dialog box you can click any number (1 to 9) associated to each level and the numbering properties associated to the level are shown in theNumber formatarea below them.
Number format
This area allow you to select and change one of the following options:
- Enter formatting for number:
Insert any text or punctuation that you want to include with the prefix number. Delete any unwanted items. The numbering in gray is a calculated field that will produce the autonumbering feature. If you accidently delete the autonumbering gray indicator, you can reinsert it by selecting another option in theNumber style for this level(see step 4). - Font:
Show the Font dialog box from which you can use any character attributes to format the list prefix. This formatting does not affect the text of the list. - Number style for this level:
Select the number style that must be applied to this level. You can select between different numbering systems, or use bullets, pictures, etc. - Include level number from:
This option (unavailable for Level 1) allows inclusion of the number of any superior level to the selected level (Level 2can includeLevel 1'slast number;Level 3can includeLevel 1'sand/orLevel 2'slast number, and so on). - Number alignment:
This indicates how the text prefix will be aligned before the paragraph text. - Aligned at:
The left indentation applied to the list. - Text indent at:
The hanging indent alignment applied to the paragraph text. - Set for all levels:
Click this button to display a dialog box where you can set the left and hanging indentation for all levels. - Apply changes to:
Use in to define the scope of the changes made to the multilevel list:- Whole list:
All paragraph (levels) will be affected. - This point forward:
Previous paragraphs (levels) will not be affected by the changes. - Current paragraph:
Just the current paragraph (level) will be affected.
- Whole list:
- Link level to style:
You can link the current level to a style such as Heading 1, Heading 2 or Caption. For example, to linkHeading 1toLevel 1, select1from “Click level to modify” (see step 1) and selectHeading 1from “Link level to style” drop down. Click OK. Now when you apply Heading 1 style to a paragraph, the multilevel list will automatically applied to that paragraph. - Level to show in gallery:
Indicates the level prefix to show in the Styles Gallery for the associated level. - ListNum field list name:
Enter a name, for examplemycustomlist, and then you can construct a multilevel list by inserting the{ListNum "mycustomlist"}field code in the document. See Insert a list usingListNumfield. - Start at:
Define the starting number for the first item of the list (default is 1). - Restart list after:
Define the outline level where the current level number must be restarted (unavailable for Heading1). By default, Level 2 restarts from 1 after every new Level 1 list, and so in. - Legal style numbering:
This option applies when the numbering system uses both Roman and Arabic numerals: Roman numerals used for higher level paragraphs will be changed to Arabic numerals in the current level paragraph.
For example, ifLevel 1usesIprefix (Roman numeral);Level 2usesInclude number from: Level 1option, and is prefixed with01text, in may be numbered asI.01. By checking the Legal style numbering option, it will be numbered as1.01instead (no Roman numeral on current level). - Follow number with:
ChooseTab character,Space, orNothingto follow the text prefix (and number), before the paragraph text. Default is a Tab character that will align in the next default tab stop. - Add tab stop at:
If you selected theTab characterin Follow number with dropdown, then you can define the horizontal ruler position of the next “Tab character”.
More Tutorials on Word Lists:
- Bullets and Numbering
- Create and Customize Bulleted List
- Create and Customize a Numbered List
- Fix Numbering Problems in Numbered Lists
- Multilevel Lists
- Define new Multilevel list dialog box
- Define Multilevel List with “ListNum field list name”
List Numbering using SEQ Fields
Sort Paragraphs or Lists Alphabetically
